
Aristotle once said, "Give me a place to stand and a lever big enough, and I could move the Earth." The concept is possibly true and whether or not it is, there is meaning here for filePro application developers. The lever is filePro, big enough to do almost any task, and the knowing "place to stand" is the key to making it work. Up until this point in the tutorials, we have been standing in one real file or another and adding, modifying and deleting records from that file or others. There are drawbacks to this scenario, but there are also things you can do about them.
The most fundamental concern for application developers is data integrity. Add to this, efficiency and usability and the problems of design are big enough to start with; but bring in the aspects and needs of a "multi-user" system, and the problems begin to really mount up. The simplest fact that two users can not be allowed to update the same record at the same time can cause everything from little hassles to wide spread calamity. In the case of our little Video Store system, multi-user problems could arise at many stages. To virtually eliminate this, we can use "virtual" files. What are these? Simple, they are nothing more than an Aristotelian "place to stand". A dummy file, from which, the application user can reach out and access all other real filePro files in the most non-invasive way. In other words, working from this "virtual" or "dummy" file one can have the most access while benefiting from the least impact caused by mandatory "record locking". All this to say, we are going to build a fake filePro file and stand in it to add customers, receipts (and catalog items) to the system from there. By doing this, we won't be tying up the real records with various filePro functions and commands that would otherwise give us serious problems.
Consider these three situations.
1) Our Video Store app works from within the customer file "vidcust". A customer brings some videos up to a register for rental. The store clerk begins updating the customer's account record, adding receipts, taking payments, etc. While he is doing this, the customer's wife goes up to a register on the other side of the store and wants to buy a DVD. The second register operator can not update the family account record, because it is already in use by the first register operator. Not a good situation.
2) Our Video Store app works from within the receipts file "vidrec". This is a little better, since multiple receipts can be added simultaneously to the same customer account. Assuming, that is, the customer record is only locked just long enough to do critical postings. The problem is solved, right? No. What if during the day, the store manager needs to run a report showing all receipts up to the minute. If any receipt record is being updated, the report will freeze on that record and wait for it to be unlocked. Not a good situation.
3) After using the "How Do I" section of this manual, you start adding some of the great features you've learned about, like the MENU function, to your programs. You don't realize that the MENU command is being run from within the INPUT processing table and therefore has the record open and locked! Nobody else can access this record for updating, or even read past it with a report, while the record is in this state. The MENU created through processing, looks so much like a regular filePro menu that one of your users thinks nothing of leaving this menu on the screen while he goes to lunch. Not a good situation, and all you were trying to do was make use of some of the powerful tools within filePro.
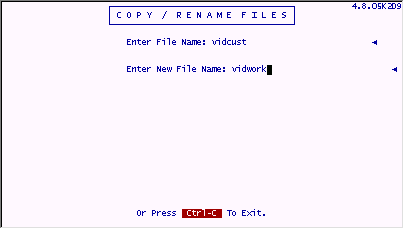
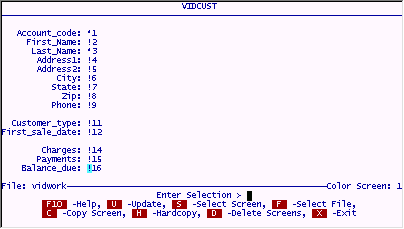
All these types of multi-user problems can be avoided by building a "work" file. This just means making a filePro file that you can use to "stand on" while you operate an application. We will do this by copying the "vidcust" file to a new file called "vidwork" and rewriting the application we have written so far to work from within that file. The actual procedure will be to enter this work file in Add Records mode, thereby landing on a free record. While on this free record ,we can do all the operations necessary to run our program, add customers, receipts, etc. When we are done running the application, we delete the record we were standing on and back out of the file. No record in any real filePro file is locked for more than the time it takes to post to it (microseconds) and still our application works just fine.
Here is how to turn this application into a better program by using a "virtual" work file.
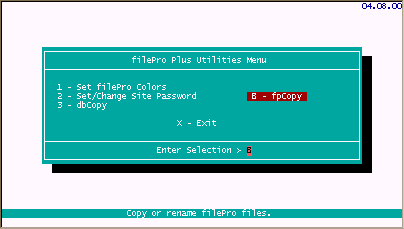
First, we will need to use "fpcopy" to duplicate the "vidcust" file.
Select F
Select B
Enter the following data.
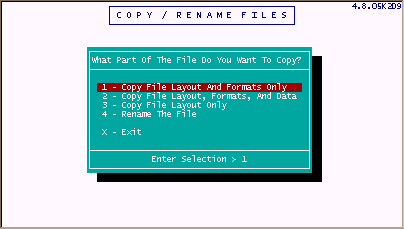
Select 1
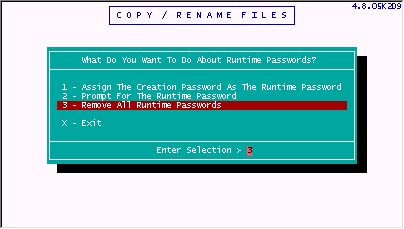
Select 3
Go into Define Screens on the file "vidwork".
Copy Screen.0 to Screen.1 and delete Screen.0.
Modify the new Screen.1 to look like this.
We can modify a screen from the "vidrec" file for use in the new "vidwork" file.
Remain in Define Screens. Change to the "vidrec" file by pressing F and choosing "vidrec" .
Press S to select screens and choose Screen.1 .

Change back to the "vidwork" file by pressing F and choosing "vidrec" .
Select C for Copy and then choose [NEW] . Give this currently "unamed" screen the name "rec" .
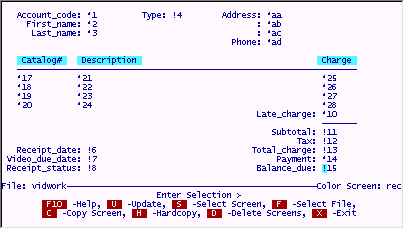
Your screen should look like this.
Modify this screen to look as follows.
We will add the processing for the "vidwork" file in two stages for testing purposes.
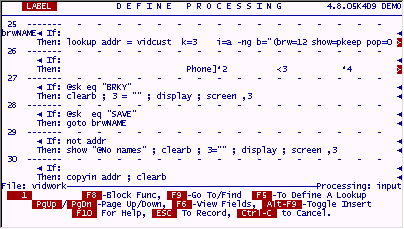
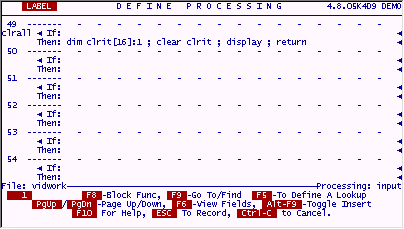
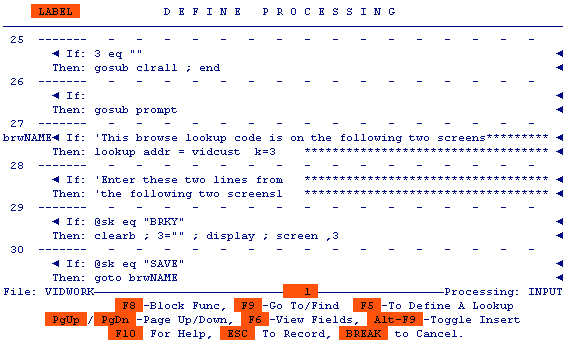
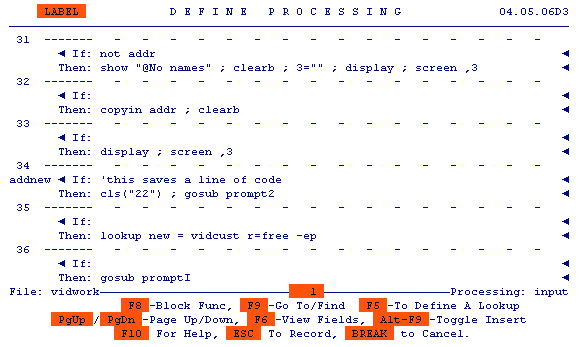
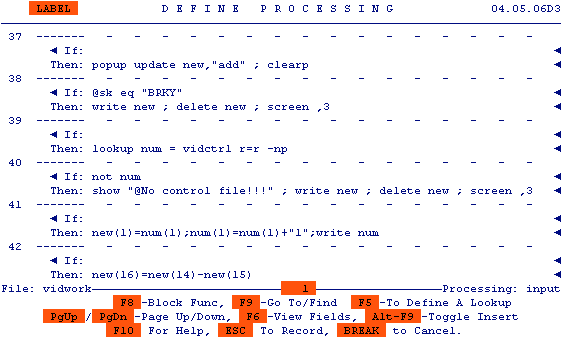
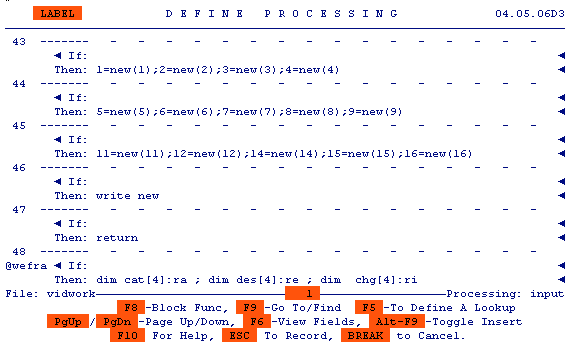
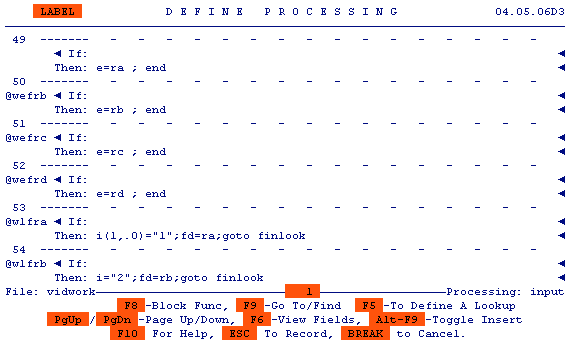
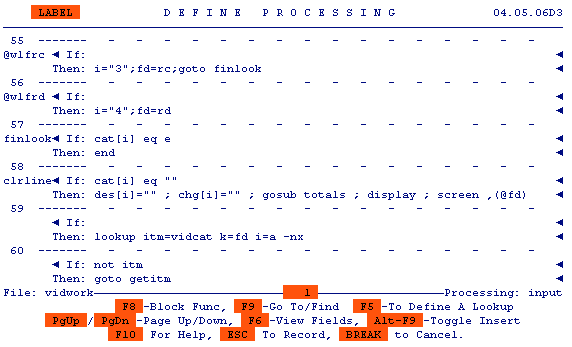
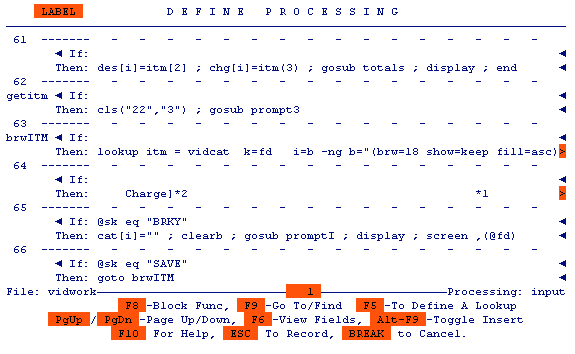
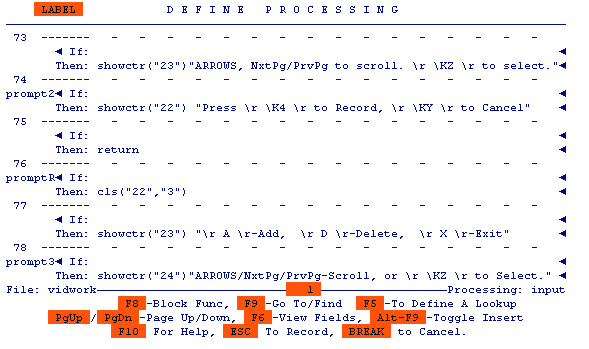
Add the 49 lines of code from the following 9 screens to the "vidwork/input" processing table.
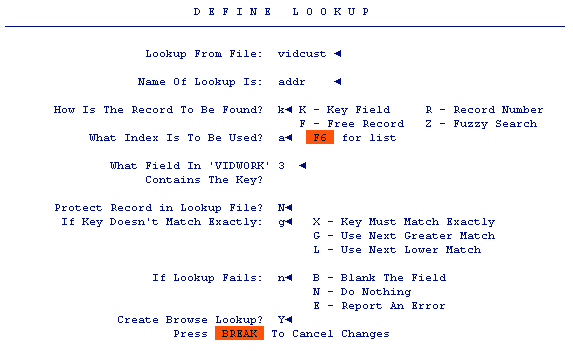
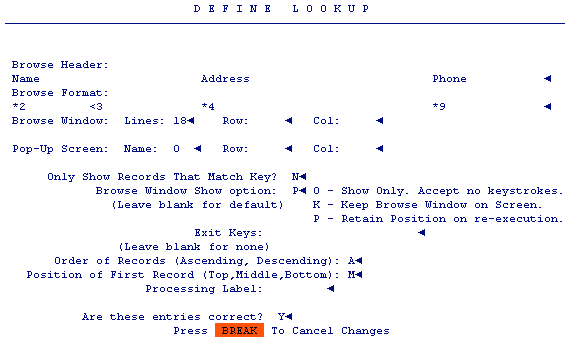
(The full lookup wizard screens for lines 25-26 are shown after this screen. Then, the processing screens continue.

Put this Work File on the menu "video" .
Enter the following data.
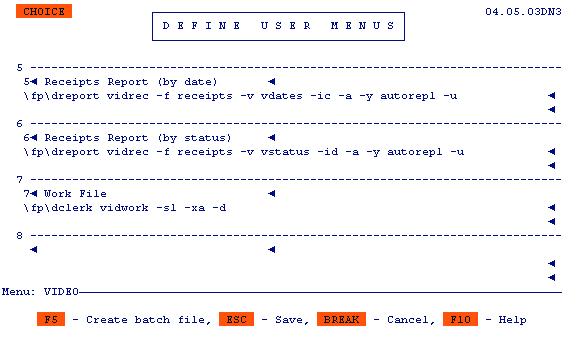
Notice that the command line includes -xa and -d. These switches tell filePro to go immediately into Add Records mode (-xa) and to clear the standard filePro prompts (H-Hardcopy, B-Browse, U-Update... etc.) from the bottom of the screen.
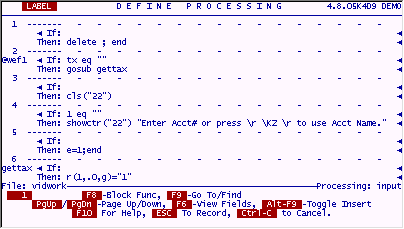
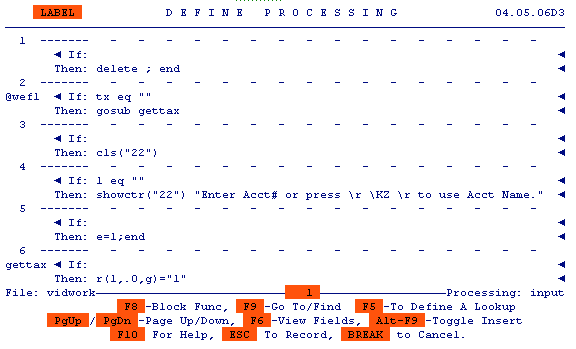
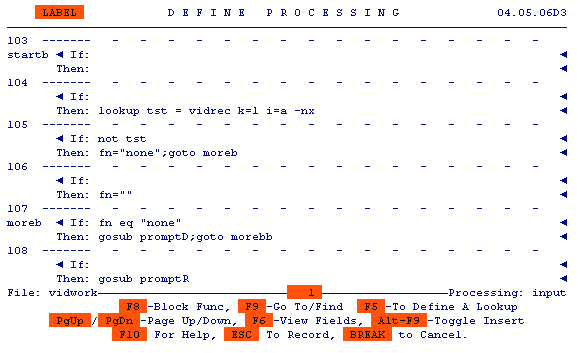
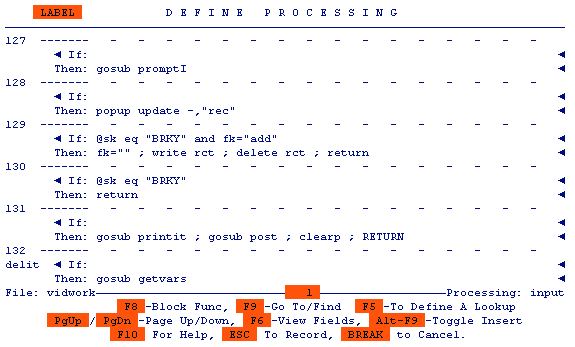
The processing code we put in "vidwork/input" does essentially the same thing as was first done in the receipts file. It lets us lookup up a specific customer's Account# and pull in the customer info. It lets us browse the customer file by name and pull in the customer info and Account#. It lets us add a new customer. This table also brings the "tax rate" lookup from the automatic processing onto this table, since this program has no need to run any automatic processing.
The only unique and new concept on this table is line 1. Since we are in Add Records mode when running this application, we will be sitting on the first available free record. When the user presses ESC, this line will DELETE the record we are standing on and END. The Add Records mode will put us on the next available free record again, which is the one we just deleted! We can stay in one place "treading water" in this file as long as need be. So can any number of other users on their own individual "place to stand" temporary record. This is because while we are standing on our record, it is locked and can not be given to anyone else. Other users coming into this file in Add Records mode get their own record on which to "tread water". Once you become familiar with this idea, it will become a valuable and useful mechanism in your filePro toolkit.
It's time to try this code.
Use the menu selection to go into the virtual file "vidwork".
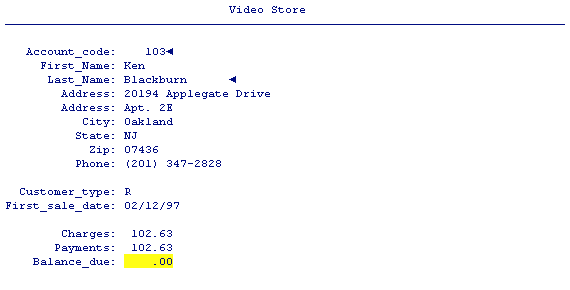
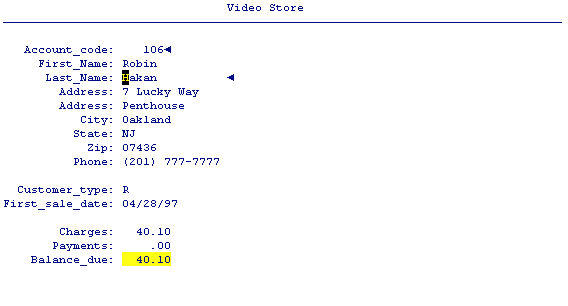
First try the Account# lookup. Enter Account# 103, you should see something like the following pop into place.
Now try the name lookup. Enter the first few letters of Hakan.
7
You will see the following browse window.
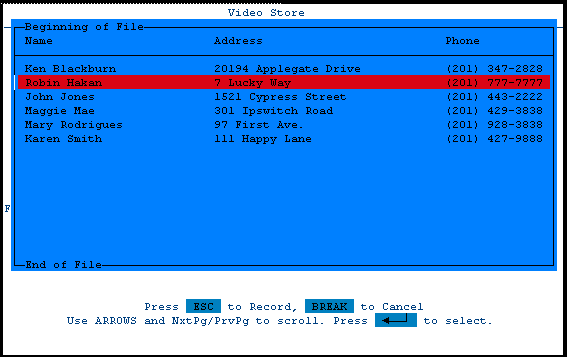
Press ENTER and the customer information is popped into place.
We have not lost the "add new customer" feature. Even though we are standing on a virtual file, the code still works properly from here.
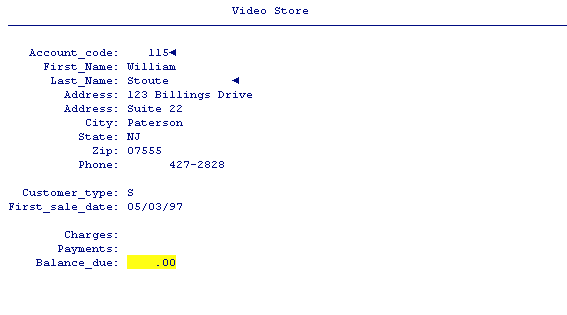
Put a period in the Last_Name field to activate the "add new customer" routine. Enter the following data.

The next unique Account# is added automatically, and the account is ready to have receipts added to it.
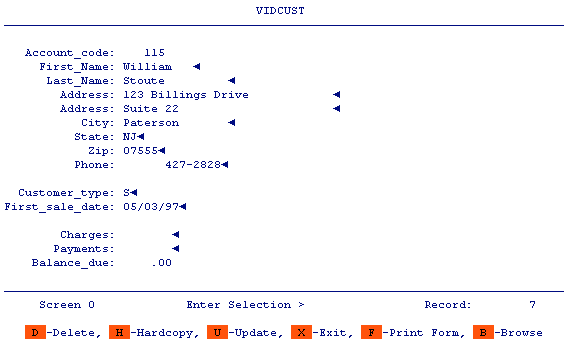
A quick check of the real customer file shows that the record has been stored here permanently.
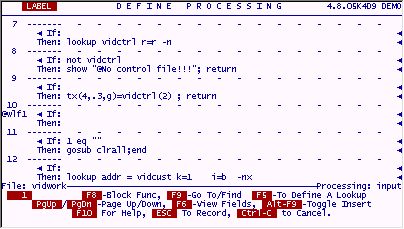
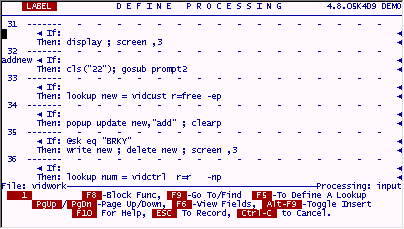
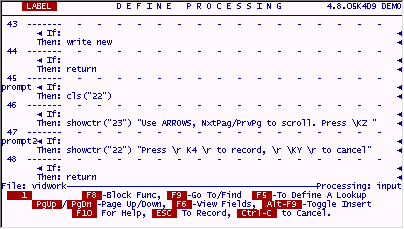
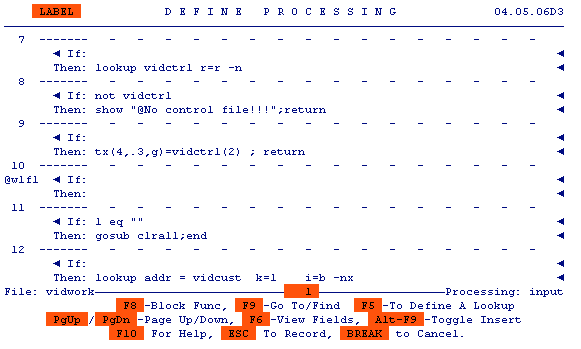
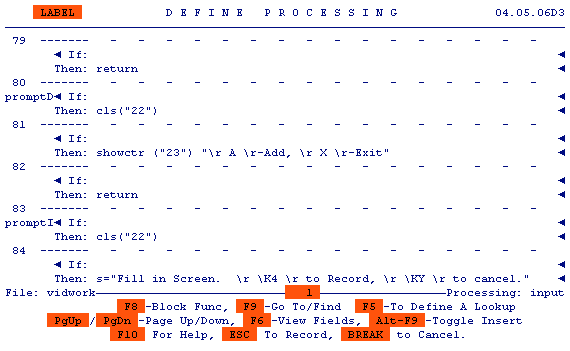
We will add all the rest of the processing for the virtual "vidwork" file now.
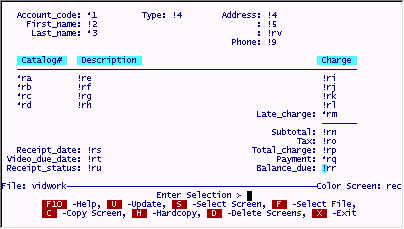
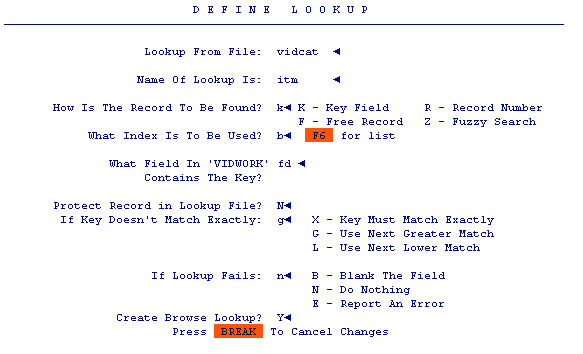
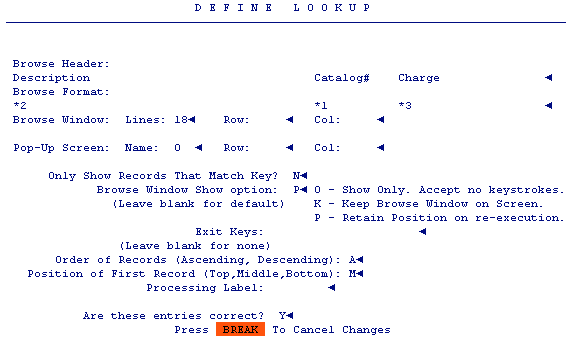
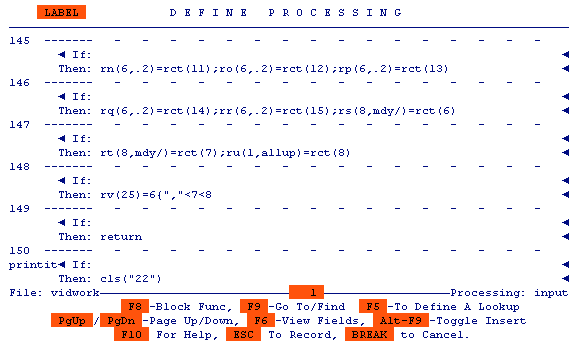
Much of this table is the same as the processing we wrote for "vidrec/input", except that lookup assignments are made to screens made up of dummy fields. At the appropriate times, these dummy fields are written to whichever real file they represent. By using dummy fields on screens defined in this file, "vidwork", we gain the ability to popup these screens and then perform @when (leaving and entering) processing on these fields. This is not possible when popping up a screen from "another" file. @when processing can only be done on fields in the current file (the file on which you are standing). If we were not able to do such @when processing, we could not popup a receipt screen and then do a lookup for either Account#'s or Catalog#'s while on that screen. There would be no "trigger" processing available.
The technique of doing POPUP UPDATE on a screen full of dummy fields, (assigning them from a lookup done just before the POPUP), and then rewriting any changes in these fields to their counterpart real fields in the looked up record, is cumbersome to say the least. But, since it gives us back the @when trigger capability, the extra work (normally done automatically by a regular "real" field POPUP UPDATE) is well worth it.
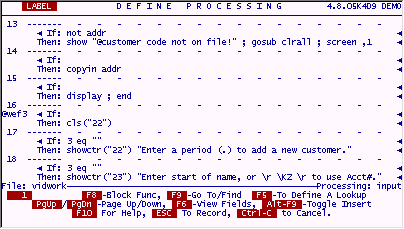
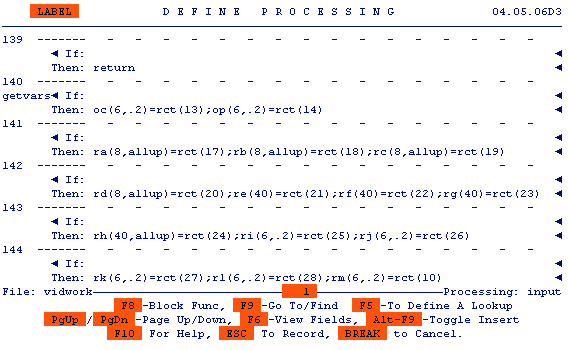
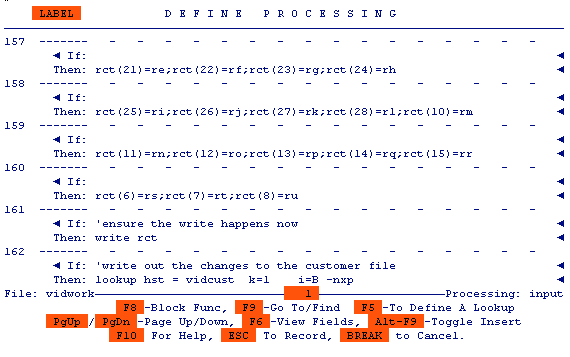
Enter the code from the following (umpteen) screens into "vidwork/input". Many of the lines are duplicated from what was there before, but some have changed slightly, so the whole "new" table is shown here. Be sure your table matches this one on all lines and do not just add in the new lines to your old table. (In other words, check line by line for discrepancies between our old code and this new table..)
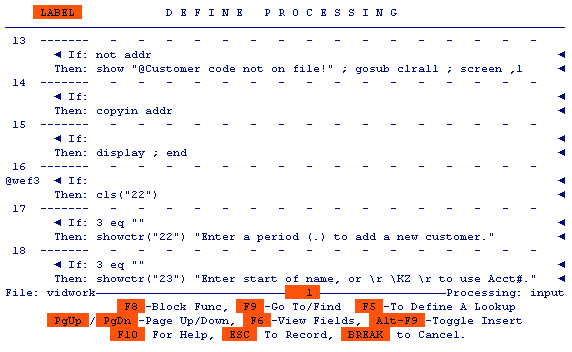
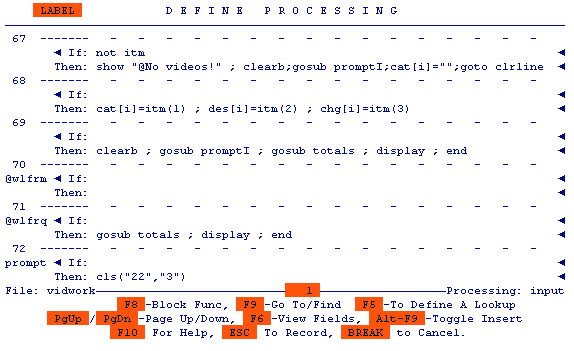
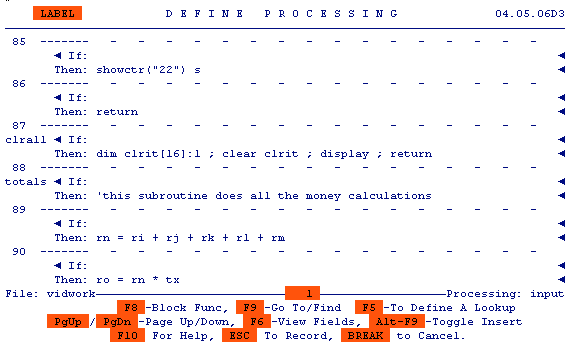

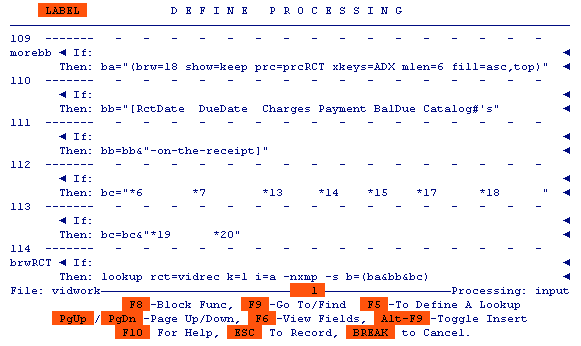
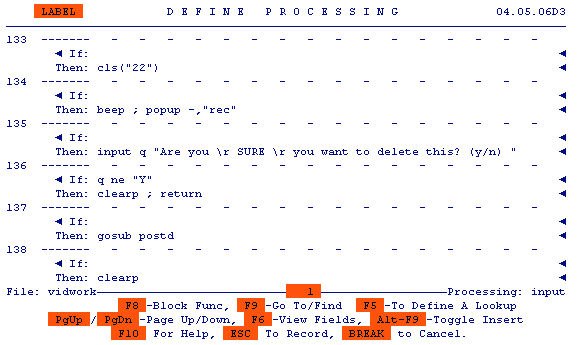
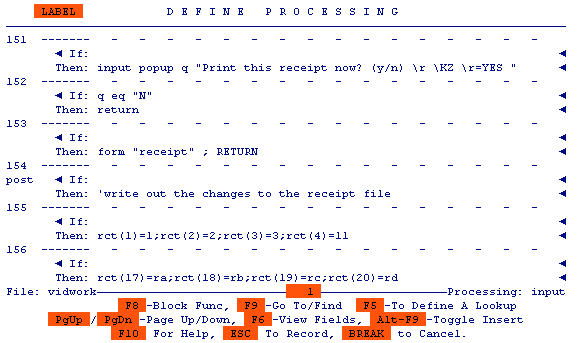

There are several enhancements to the Video Store app in this table.
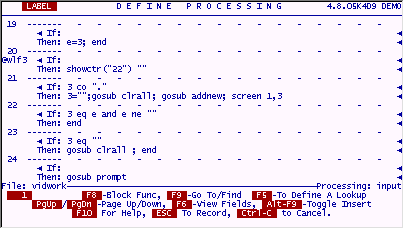
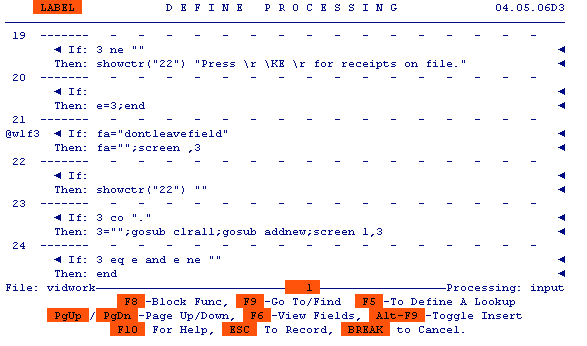
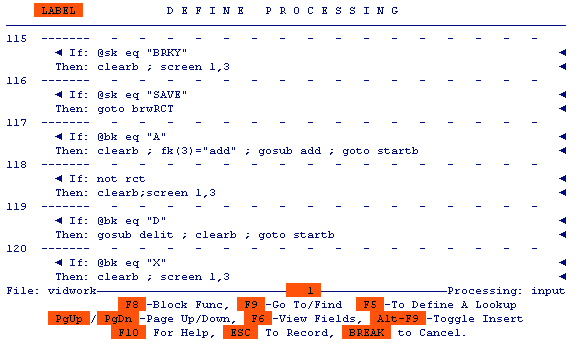
A new trigger has been used, @wuk processing (at when user key). This means, do some processing when the user is sitting in a particular field and presses one of 4 special "user-keys". These user-keys are F8, F9, F3 and F4. We are implementing @wuk3 and showing the prompt F8 as the key which can be pressed while in this field. Pressing this key brings up all the receipts on file for the Account# we have on our screen. This browse lookup has several "exit keys" attached to it which means the user can press any of these keys while the browse window is up, and the designated action will occur. They are called "exit keys" because, by their nature they suggest exiting the browse window to accomplish some task. We have defined exit keys to Delete the receipt record under the highlighted bar, to Add a new receipt directly from the browse screen, and defined that X will clear the browse window and return the user to the first screen.
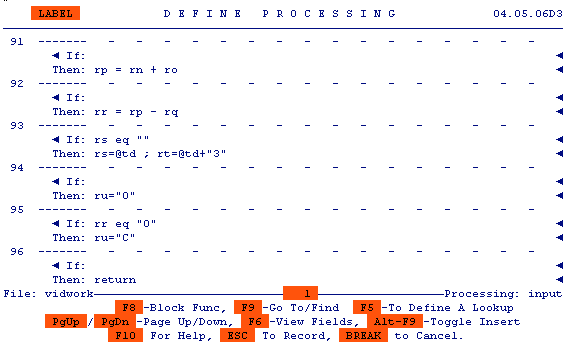
The new browse into the receipts file (label brwRCT) is also built a little differently than normal browse lookups. It is built by filling some variables with the different parts of the browse lookup and then using these variables on the browse line itself. This is a very valuable trick to use when the browse data lines you want to show are too long to be built using the browse lookup wizard.
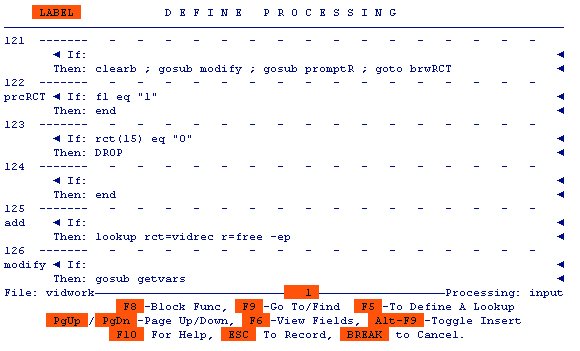
The brwRCT browse also makes use of "browse processing". This is a special kind of processing that happens just before each looked up record is put in the browse window. In our case, we are using this processing stub to test whether the record about to be put on the screen has a Balance_Due equal to "0", if it does, the DROP command causes it to be left out of the display. We only see records on which money is owed.
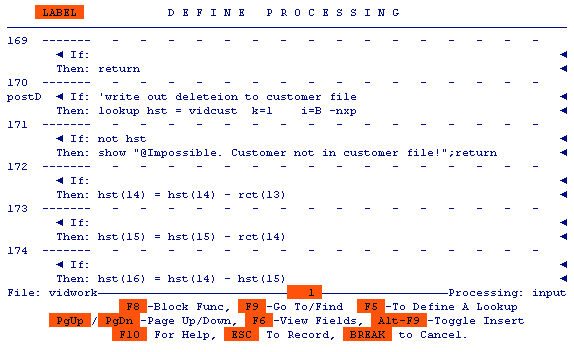
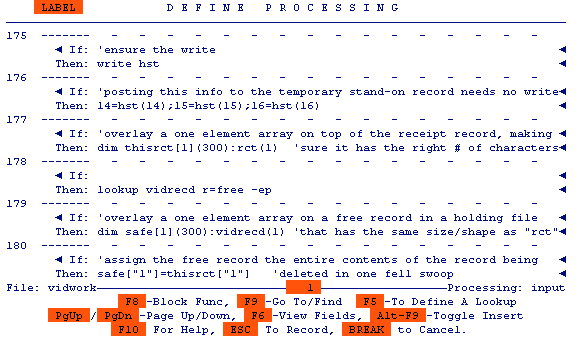
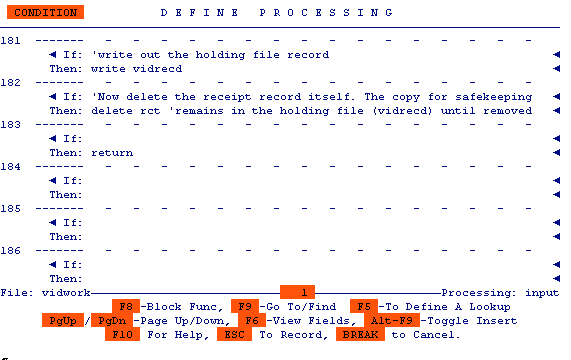
The "delit" subroutine calls another subroutine "postd" which uses arrays to delete a receipt record and also save a copy of the receipt in a "safe" file. This prevents users from deleting records and leaving no trace. By overlaying an array on the receipt and overlaying an array on a free lookup into the "safe" file (an exact duplicate of the receipt file), the processing can copy the record from one file to the other with one command, rather than a series of many field assignments.