We have been operating our Video Store at a severe disadvantage. Each time a tape is rented, we have to put in its description and price. Obviously, this would never do in a POS (Point of Sale) situation. We need to add some processing that will let us keep our inventory in a file and call up its information (description/price for each item) as needed and instantly.
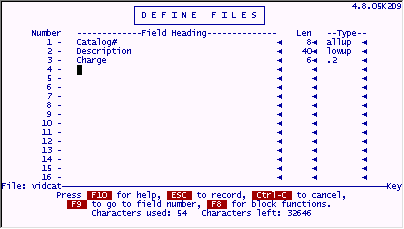
We'll call this file "vidcat" and refer to it as the Catalog file. It does not have to be a complicated file. In fact, it will probably be the simplest filePro file you ever define.
Go into Define Files and choose [NEW ]. Enter the name "vidcat" and do not give it any password.
Enter the following data.
Press ESC to store your work.
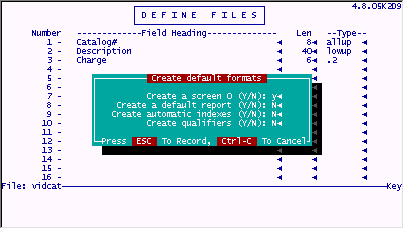
Press X to finish designing the file.
Enter the following in the options dialog popup.
To make things really easy to code and work very smoothly, we must adjust the "vidrec" file a little.
Go into Define Files for "vidrec" and modify the following fields to look like this. (We are making them into associated field groups.)
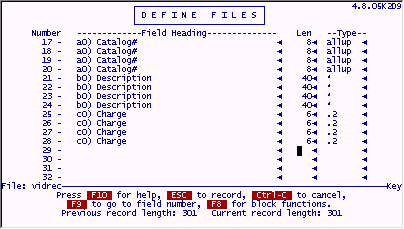
Press ESC to store your work.
Press X to finish the design of this file.
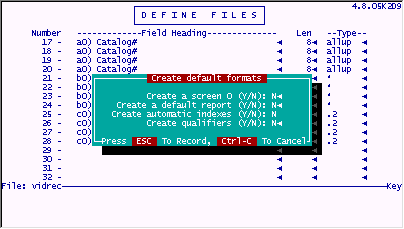
IMPORTANT : Do not put a Y in any option on this popup.
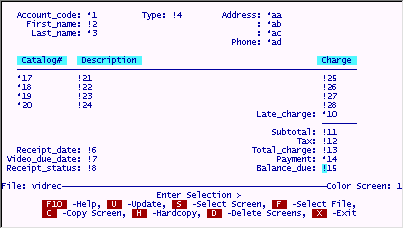
The screen in the receipts file must now be changed. The charge and description for each item will now be automatically "popped in" by a lookup to the Catalog file. These fields must be changed to protected fields. The application will fill them now.
Make the receipts screen look like this.
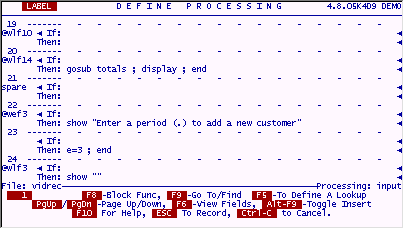
There are changes needed in the processing table for the Receipts file as well.
Remove the @wlf labels for fields 25 through 28 . The cursor will no longer pass through these fields, as they are now protected.
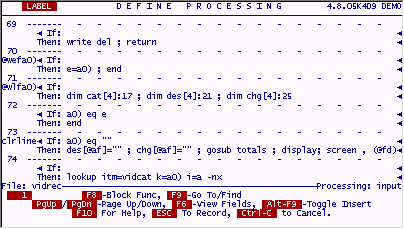
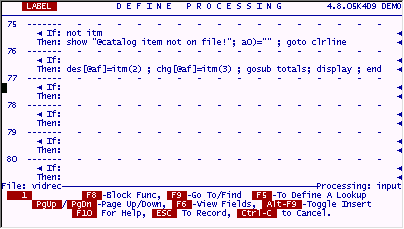
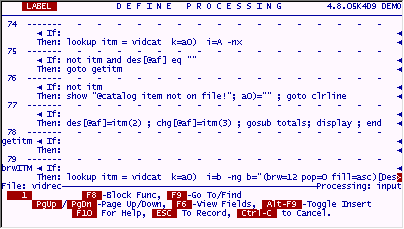
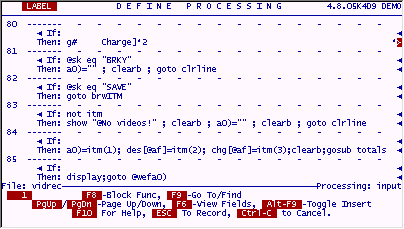
Continue adding the new code for the Catalog file lookup at line 70 . Add the processing from the following two screens.
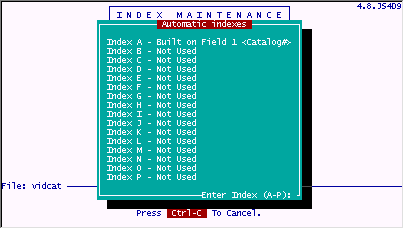
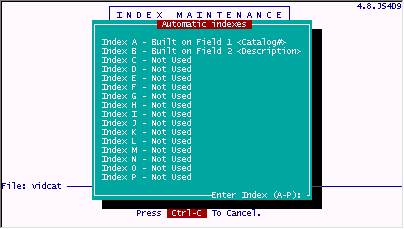
In order for the code to work, an index is needed on the catalog# field in the "vidcat" file. Go to Index Maintenance and add the following.
Add the Catalog file to the "video" menu as shown.

Use this menu choice to enter the Catalog file through IUA.
Choose Add Records mode . Add the following item.
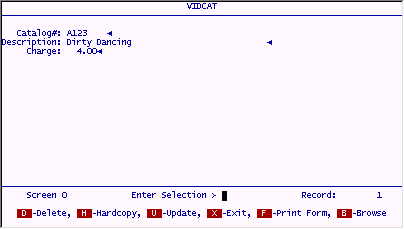
Press ESC to store your work.
While you are in Add Records mode, add the following Catalog items as well. We will need them for testing purposes.
Finally, we are ready to try this out.
Add the following receipt and enter the following in the first Catalog# field.
You should see the following information pop in.
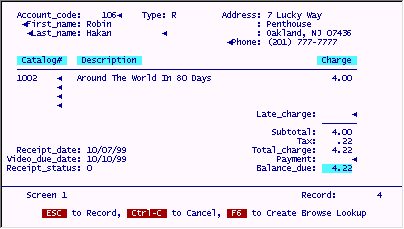
Note that the calculations for subtotal, tax and total still happen correctly.
This is all part and parcel of the special when-leaving code we put in to do the lookup into the Catalog file and retrieve the description and charge. It is special because it uses "associated fields" and "arrays". However, it is not difficult to explain or understand how these features work. The @When Entering and @When Leaving Trigger a0) on lines 70 and 71 happen when the cursor leaves "any" of the fields in the a0) group. When this happens, filePro knows "which" instance of the associated field group was actually left, this is a0). FilePro also assigns the number of this instance to the system maintained field @af. If the cursor just left the second a0) field, @af will be filled with a "2". If the cursor left the last a0) field, @af would be filled with a "4". Because we know this number, we can act upon the same numbered Description and Charge fields along the same line item in their turn.
To help do this, an "array" is built on each of these associated field groups. Arrays can be "overlaid" onto real fields starting at any field number. When you build an array, you use the DIM command . (You DIMension the array to have so many elements.) In our case, we are building three arrays, each with 4 elements. These arrays are overlaid or "aliased" to the real fields that represent Catalog#'s, Descriptions and Charges. The arrays are given names that help identify them to us. If we refer (on the processing table) to chg["2"], we mean the second element in that array, or the second field from the one on which it was overlaid. If we change chg["2"], it is the same as changing the real field just as if we had done it using the field number itself. They both are the same field. In other words, using field 26 or chg["2"] is exactly the same thing.
The power of arrays lies in the fact that we can use an expression for the element number in the array. In other words, we can use chg[aa], where field aa is equal to "3", and be referring to chg["3"] or field 27. This is exactly what is being done in the Catalog# lookup. We know which associated field instance the cursor left (1 through 4) because filePro fills @af with this number for us automatically. We can then manipulate the other fields across this line item by referring to them as des[@af] and chg[@af]. These fields will be the same distance down in their respective arrays as the field the cursor left in the Catalog array.
The combination of arrays and associated fields let us write the code once, and use it on four different lines, all because we can say @wlfa0) (associated field) and because we can alias a named array to real fields.
However, even with all this elegant coding, there is a small fly in the ointment. How often would you think the Catalog# of any particular video gets "rubbed off" or "scribbled over". Probably, more often than not! It is important that we be able to lookup these Catalog items by their name (description) as well as their number. This will require some more code, but not much, just a browse lookup.
It will also require a new index in the Catalog file built on Description.
Go into Index Maintenance on the "vidcat" file and add the following.
To look into the Catalog file based on description, we only need to add a simple browse lookup.
Modify the "vidrec/input" processing table to include the following two screens.
Try out this code now.
Enter the following in Add Records mode in the "vidrec" file.
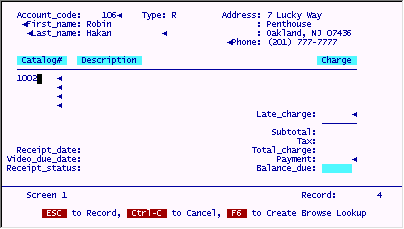
Call up Account# 106 , and then enter an "f" in the first Catalog# field as follows.
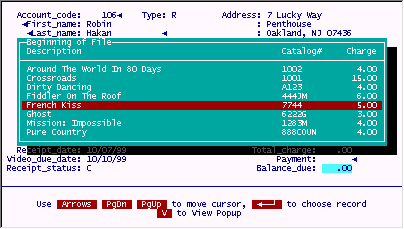
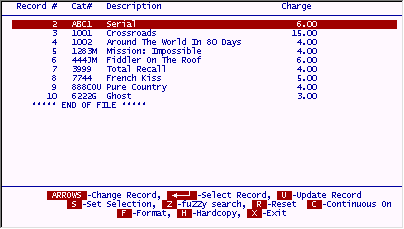
You will see the following. The display starts from the first "f" on file and extends alphabetically from there in both directions.
Move your highlighted bar down to this record and press ENTER .
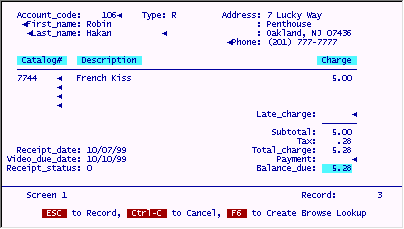
You will see the following pop into place.
Feel free to experiment with this lookup. Note that if you do enter a valid Catalog#, the browse lookup is bypassed and the correct data is simply retrieved onto the line item.