Version 6.0.00 enhancement
from the F8 – Options in Define Output, you can select F – Hide or Show Forms. This will allow you to manage the .out files that are hidden from clerk. A list of .out files will appear when you press F. This list will display showing .out file hidden with an asterisk and those not hidden unmarked. You can manually toggle the .out files or you can press F7 to reverse toggle them all. Once you have the list the way you wish it to be, press SAVE to process the new settings for this one directory.
Also allows you to switch just the .out file that you have selected by selecting F8 – Options. The line “Hide forms from clerk: N” determines rather this form is hidden or not from clerk (IUA).
Contents of this section
Features
Kind of Output
Formats
Forms
Labels
Reports
Define Processing Only Format
Grouping [Subtotal & grand total breaks]
Sorting
Extended Functions
Features:
The "Define Output" option is used to create printed output and process only formats. Any output you define with this option can have output processing associated with it to do things like; printing a field value from other files; posting field values from the current file to other files; posting calculated data to other files. Output formats can contain real fields, system maintained fields and dummy fields as well as any literal text for thinks like 'Report Titles", "Field Headings" etc. The presentation of the printed output is controlled through the use of print codes to change fonts, line spacing and other characteristics of the output.
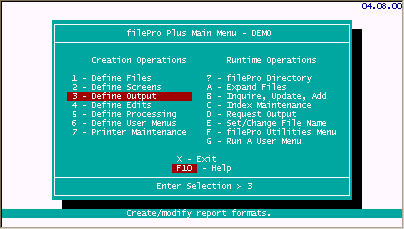
Select Option 3

You will see a list of filePro files from which you can choose.
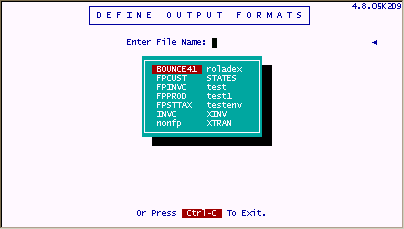
After selecting the filePro file from the list, you can select an existing output format, if you want to modify the format, or create a new format by selecting [NEW].
When selecting [NEW] from the listbox, you can enter the "Output Format" name of your choice. In this case, we will create a new list output format by typing "list".
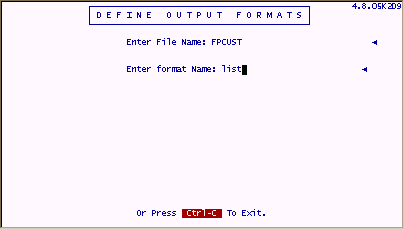
After entering a format name ("list" in this example) and pressing enter, you are presented with various options for defining your output format as follows;
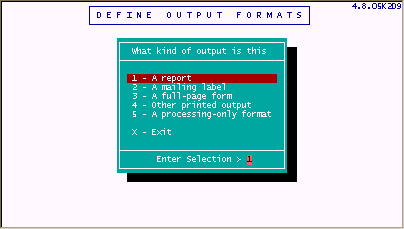
Kind of Output:
|
Option 1 |
A report is the standard output format that provides three sections including; Heading/Title Lines; Data Lines; Total/Sub-total Lines |
|
Option 2 |
A mailing label provides for printing several labels across the page. |
|
Option 3 |
A full-page form is typically used when printing a single page for each record. |
|
Option 4 |
Other printed output is similar to option 1 but a catchall option. |
|
Option 5 |
A processing only format is used when you do not want a printed output (normally used for posting to lookup files). |
The above options give you a lot of flexibility to rapidly design any output you will ever need.
A Report:
When selecting option 1 for "A report", you are presented with a screen to set the options for your output as follows;
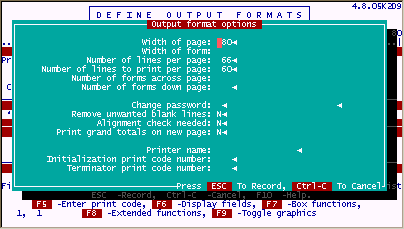
The "Output format options" are self-explanatory for standard output formats, but it is important to consider the purpose and controls you wish to invoke when printing your reports. For example, if you include payroll check printing in a system, you will probably want your checks to always go to a specific printer where your checks are pre-loaded and provide for printer alignment checking. A "check printing" format would probably also have password protection whereas most other printed output would not require that level of control. So for "Check Printing", you would want to enter a "Y" at "Change password", change the "N" to a "Y" at "Alignment check needed", and specify your check printer in the "Printer Name" option. Note that the "Printer Name" is assigned through the " Printer Maintenance " option.
Getting Help
Although a help key option is not displayed as an option in the above screen, when pressing [F10] you can get help and recommended settings for each option. An example is provided as follows.
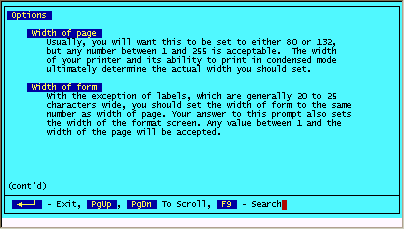
For options "Printer name", Initialization print code" and "Terminator print code number", you can press the [F6] to lookup the predefined values, highlight the value you want and press "Enter" to plug in to the options. The following is an example for the "Printer Name" option.
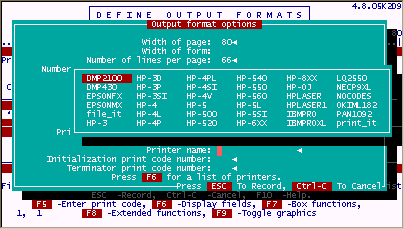
As with most other filePro options, there is always more than just one way to accomplish your objective. You can leave the "Printer name" option blank, and use a "Request Output menu flag " instead. This is even true for the password option since you can prompt a user for a password through processing by using the command " INPUTPW " or "INPUTPW POPUP". In fact, using the processing commands is probably a better method if you have a multi-user system for a large office and want to provide system administration features with your system design. This will prevent having to change the system when the payroll clerk leaves the company for another job. You could do this by creating a password file that is accessed for sensitive data (like payroll) so that password(s) can be periodically changed by the office administrator instead of a single password controlled through the output format. This would be a better method if you are distributing the system to more than one company.
Sort Fields
When defining a report, you can specify the order of data or sort fields to be used. For our list, we have selected the "last name" and "first name" as our sort fields.
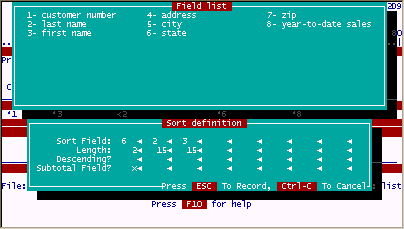
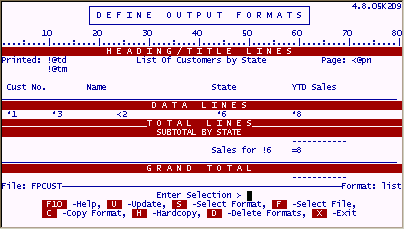
The default sort is in "ascending" order, but typing an "X" in the "Sort Definition" for your fields, you can sort in "descending" order. You can also identify what fields you want a sub-total break to occur on by typing a "X" or "F" (Form feed) in the Subtotal Field row. In the above screen, there is a subtotal on field "6" or "state" to calculate the total sales by state. The customer list is further sorted by name within each state. A typical report definition might look similar to the following.
Field Indicators
The following field indicators can be used on reports.
|
* |
Data printed starting at this position. |
|
! |
Same as asterisk. |
|
< |
Push left ---- data is moved left leaving one empty space between fields. |
|
= |
Subtotal or total this field (subtotal and total lines only) |
|
\ |
Truncates field. |
Note that an equal sign is used as the field indicator inside subtotal and data areas to obtain the appropriate total for any numeric field. Also note that system maintained fields are used on this example, i.e., @td (todays date), @tm (current time), @pn (page number). These will be replaced with their proper values when printing or viewing the output. Note finally, that the "push left" operator (<) can also be used on report formats. It is used here to push the page number one space away from the literal "Page:" and to push the customers last name to the left.
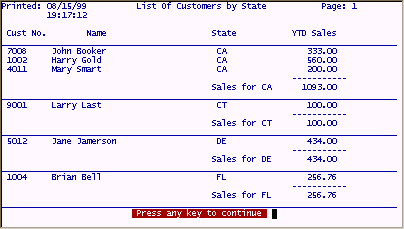
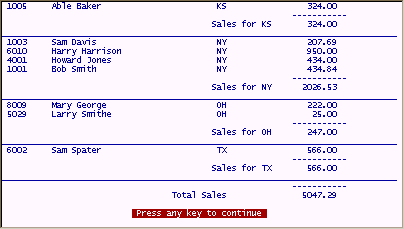
Sample Output: The sample definition yields the following results.
Sample Output: Last page
IMPORTANT: Processing tables can be associated with output formats, making use of fields, text, calculations or data from any filePro file (or other system resource). This attached processing is automatically given the same name as the output format (be it a report, a form, or a label). You can choose to run an output format with a "different" processing table. This is done by using the -z option flag from a menu or system prompt for dreport or rreport, and placing the name of the desired processing as the argument following the -z (after a space).
Refer to output flags for additional information on use of -z and other output flags.
Example 1:
dreport filename -f formatname -z othername -a
If there is an attached processing table to an output format and you do not wish to run it (or any other processing either) then you can put a "" after the -z option. This will let you employ the format with no processing at all.
Example 2:
dreport filename -f formatname -z ""
IMPORTANT: While in Inquire, Update & Add, the processing attached to any output format will be executed if the format is selected by pressing the (F)-Print Form option. However, if the form is called from within INPUT processing as in:
Then: form "invoice"
the attached processing will NOT be run. You must make sure that all variables and calculations you need for the output called in this manner are present on the INPUT table before this line is reached.
A Mailing label
This option can be used to print mailing labels, rolodex cards, index cards etc. where you do not have headings or footings, or want to print multiple forms across a page. You can also use this type of format to print from IUA using the " form " processing command or selecting a form name while IUA.
Select LABEL
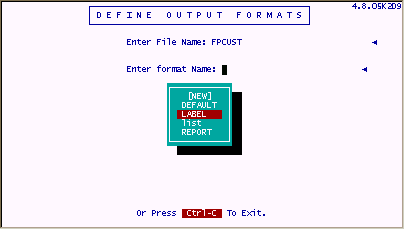
This label format has been previously defined for FPCUST.
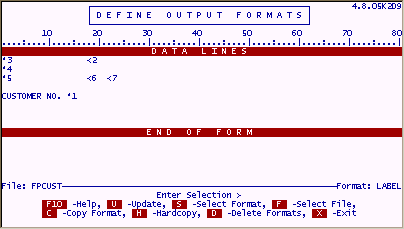
Press [U] - update, to edit the format.
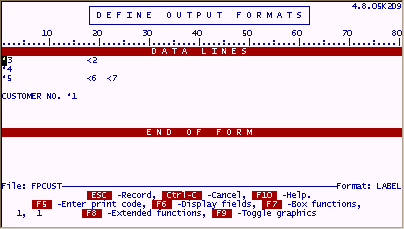
When pressing [F8], the following screen is presented.
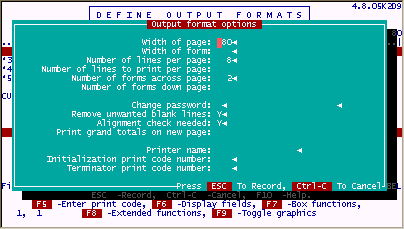
When defining a new label or when selecting O - Options, you will see a screen to control your report format.
"Width of Page" - how wide your paper is in terms of the number of characters. The standard 8.5 inch paper is 85 characters wide when using 10 pitch (10 characters per inch). The widest that you would want to go when using standard letterhead is 80 characters to allow for margins. The maximum number of characters for 14 inch wide paper would "144". Typically you will use "132" character width of page (default) to provide a "6" character margin on each side the page. The program accepts a maximum of "255" character width of page.
"Width of Form" - With labels, the width will probably never be greater than 25 characters. If you are printing index cards with two across the page, then your width would be 40 characters. The maximum is the same as the maximum width of page i.e. "255" characters.
"Number of Lines per page" - Use the vertical measurement of your individual labels for label stock, or cards for card stock or other printing stock. Include blank lines at the top and bottom of the label in determining the number of lines to print. The number of lines to print will equal the number of lines per page for this format type. By leaving blank lines at the top and bottom, it makes it easier to position your printing stock in the printer at runtime since the top edge of the paper can be used for alignment.
"Change passwords" - Use this option to add or change your format password.
"Remove unwanted blank lines" - This will remove blank lines so is not recommended for labels or other report formats where data needs to be positioned in a certain place on the form.
"Alignment check required" - This will force an alignment check before printing your data. This is useful for labels and other formats where page alignment is critical.
"Print grand totals on new page" - This is useful if you want to separate the grand totals from the detail report to create (in essence) a separate report for grand totals. This option will not be available for reports unless grand totals apply e.g. it does not apply for labels and full-page forms.
"Initialization print code number" - You can apply a print code to be sent to the printer before the job is started. This overrides the default initialization code for the printer driver and can be useful for things like setting another font, changing from portrait to landscape, etc.
"Terminator print code number" - Sends a print code to get ready for the next print job e.g. send print code for portrait mode after printing this report in landscape mode.
A full-page form
A full-page form is usually used to print checks, insurance forms, invoices etc. In general, anytime you want to print a page of information for a single record in a file e.g. checks, invoices, statements etc. use this output type. You can also use this type of format to print from IUA using the " form " processing command or selecting a form name while IUA.
Other Printed Output
This option lets you design a form free-hand. The program gives you heading, data and sub-totals/totals and is very similar to option 1.
Process-Only format
This format is primarily used for batch posting operations, archiving, recalculating results, creating export or merge files to be used with word-processing and spreadsheets etc.
There are two steps to defining processing-only formats. First is setting up the sort instructions and password (accomplished through this option) and defining the processing. Only the first step is covered on this topic. See " Define Processing " for the 2nd step.
Select 3 - Define Output

Select FPCUST and Select [NEW] to create a new format.
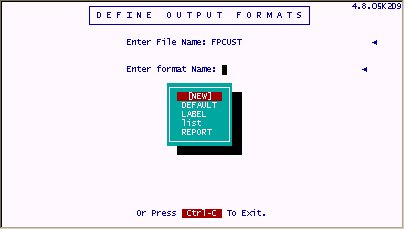
Enter "export" as the format name. This would be a typical processing-only format name.
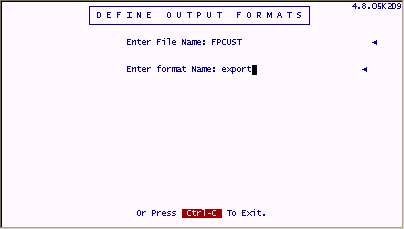
Press Return
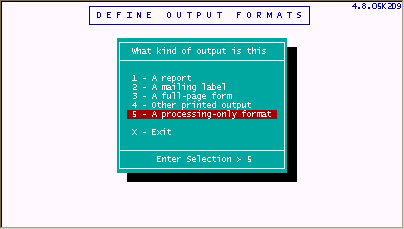
Select 5 - A processing-only format
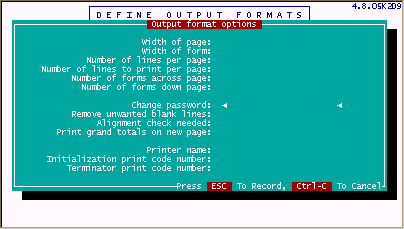
Enter Y or N for change passwords
Note: If you assign a password, the user will be prompted for the password to run the output. If you intend to use scripts or batch files to run the processes unattended, do not assign passwords.
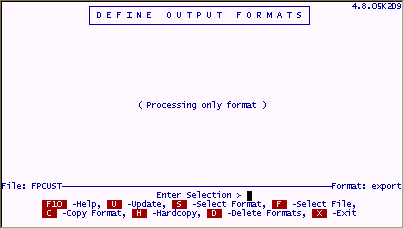
This completes the processing-only format. Press ESC to save the processing table and then Press X to exit to the filePro main menu.
See " Define Processing " for creating the "export" output processing table.
Extended Functions - [F8]
We have previously covered some of the extended functions options such as "O-Options", "S"-Sort Information, etc. but these are worthwhile mentioning again so that they are all covered in the same place in this documentation.
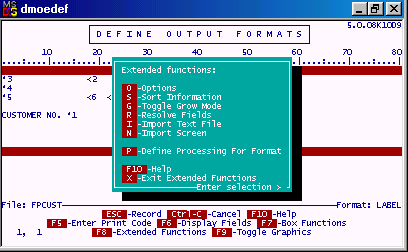
After pressing "U"-Update to update a report format, press the [F8] key to see the "Extended functions" menu as follows.

"O-Options" - Allows you to set various options for the report format as follows.
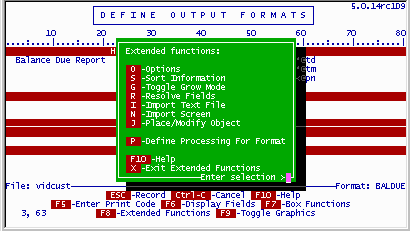
"Width of Page" - how wide your paper is in terms of the number of characters. The standard 8.5 inch paper is 85 characters wide when using 10 pitch (10 characters per inch). The widest that you would want to go when using standard letterhead is 80 characters to allow for margins. The maximum number of characters for 14 inch wide paper would "144". Typically you will use "132" character width of page (default) to provide a "6" character margin on each side the page. The program accepts a maximum of "255" character width of page.
"Width of Form" - With labels, the width will probably never be greater than 25 characters. If you are printing index cards with two across the page, then your width would be 40 characters. The maximum is the same as the maximum width of page i.e. "255" characters.
"Number of Lines per page" - Use the vertical measurement of your individual labels for label stock, or cards for card stock or other printing stock. Include blank lines at the top and bottom of the label in determining the number of lines to print. The number of lines to print will equal the number of lines per page for this format type. By leaving blank lines at the top and bottom, it makes it easier to position your printing stock in the printer at runtime since the top edge of the paper can be used for alignment.
"Change passwords" - Use this option to add or change your format password.
"Remove unwanted blank lines" - This will remove blank lines so is not recommended for labels or other report formats where data needs to be positioned in a certain place on the form.
"Alignment check required" - This will force an alignment check before printing your data. This is useful for labels and other formats where page alignment is critical.
"Print grand totals on new page" - This is useful if you want to separate the grand totals from the detail report to create (in essence) a separate report for grand totals. This option will not be available for reports unless grand totals apply e.g. it does not apply for labels and full-page forms.
"Initialization print code number" - You can apply a print code to be sent to the printer before the job is started. This overrides the default initialization code for the printer driver and can be useful for things like setting another font, changing from portrait to landscape, etc.
"Terminator print code number" - Sends a print code to get ready for the next print job e.g. send print code for portrait mode after printing this report in landscape mode.
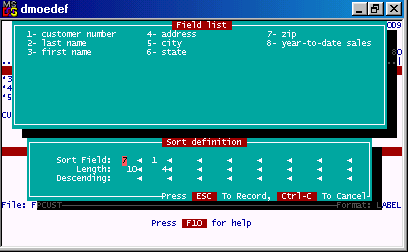
"S - Sort Information"- Allows you to control the sort order by field number, field lengths and ascending or descending order.
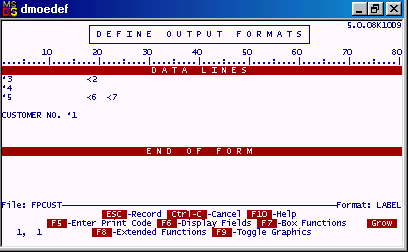
"G - Toggle Grow Mode" - Allows you to change how the [F3] insert key and [F4] delete key works. When grow mode is toggled on, you will see "Grow" in the lower right corner of the screen as depicted above. While in "Grow" mode, you can add or remove lines to the bottom of your format. When "Grow" mode is off, the [F3] and [F4] inserts and deletes a line under the current cursor position.
"R - Resolve fields" - This will redraw the screen and display the end of field markers to assist you in making sure that you have enough room for each field.
"I - Import Text" - Allows you to import a text file at the current cursor position.
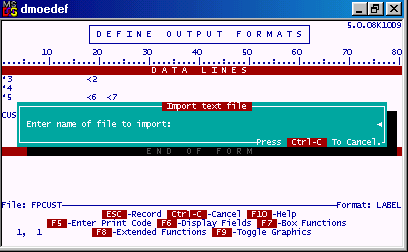
"N - Import Screen" - Allows you to import a screen format at the current cursor position. Select the applicable screen number.
Note: Make sure that your report length and report area have been adequately expanded to handle the screen that you are importing or you may overwrite things like subtotal break fields or other previously defined report variables.
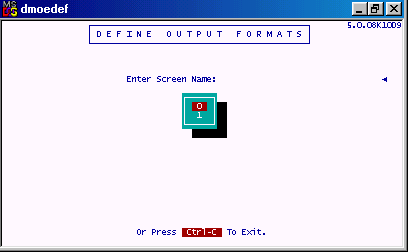
Select the screen name you want to import to your report format. The entire screen will be imported to the current cursor position. If there is not enough room for the entire screen to be imported, you will see a WARNING message similar to the following.
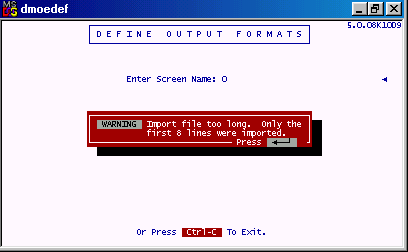
Press Return to accept or [Ctrl - C] to abort the import.
"P - Define Processing For Format" - This option allows you to define a processing table without exiting the report format.
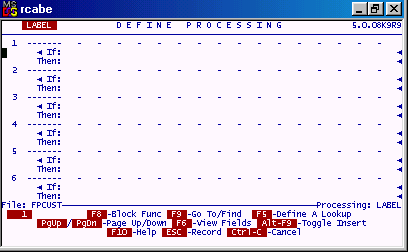
Enter your processing table lines and press [ESC] to return to the defining the format.
Note: This option will provide the same functionality as using the "Define Processing" option from the filePro Plus main menu.
"X - Exit Extended Functions" - Returns you to the regular "Define Output" functions.