Contents of this section
Description
Using Define Screen Help
Copying a Screen
Adding Fields
Toggle Graphics
Box Functions
Adding Color
Resolving Fields
Advanced Section
Description:
Use this program to create Input Screens (subsequently referred to as "Screens") for use in adding and changing record information in a filePro file. Input screens are often referred to as "forms" in other programming languages. An almost unlimited number of screens can be created for each filePro file. Multiple screens can be created when you have more data in each record than can fit on a single screen or to control input functions. Suppose you are developing an "Accounts Payable" application. You will probably want separate screens for entering payments and charges. Payments may be entered on screen named "pay" and charges on a screen named "chg".
Separate screens can be used to protect certain data from change or access by unauthorized users such as a "Payroll" system. Although you have a payroll entry clerk, you may not want the payroll clerk to have complete access to all employee information. This sensitive information can be maintained by a separate screen with password protection to allow access by management personnel only.
As you design screens, keep in mind that you can use system-maintained fields, "real" fields defined through the " Define Files ", and variables created by " Define Processing ". System maintained fields contain information 'remembered' by the system, e.g. the date a record was first created, when the record was last updated, etc. System maintained fields are built into filePro and can't be redefined.
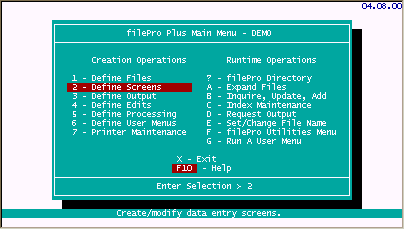
Select "Define Screens" option 2 from the filePro Main Menu.

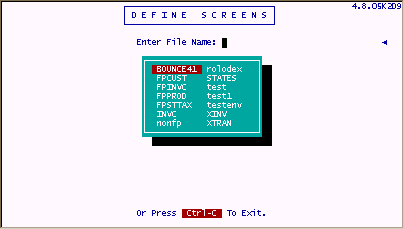
Select a file name from the list of files by highlighting the filename and press Return.
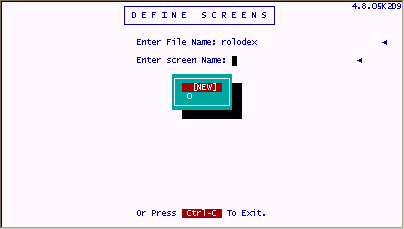
After selecting the filename you will only see option [NEW] for a new screen and "0", the default screen 0, which was created by "Define Files" for file "Rolodex".
Notes: The screen name is limited based on the Operating System you are using. If you want to maintain WINDOWS compatibility, use screen names of three characters or less.
If you assigned a creation password to a file during the "Define Files" operation, you will be prompted for this password. This prevents unauthorized users from creating screens for your password-protected files.
If you press Return while [NEW] is highlighted, you can enter a new screen name. In our case, we are going to select "0" to use screen 0. This screen was the default screen created when defining the file.
Enter "0" and press Return.

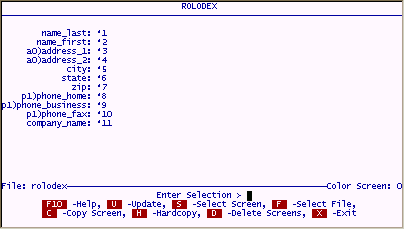
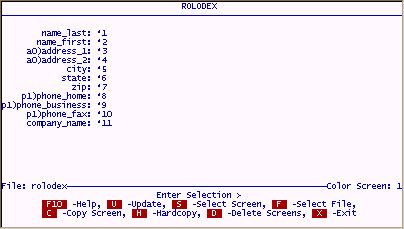
You will be presented with default screen 0 with selection options at the bottom of the screen depicted as follows;
Using Screen Help
Press F10 for help and the following "Help Screen" is presented for define screens.
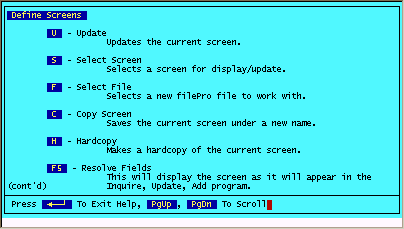
The help screens provide descriptions of the selection options shown for the previous screen. When you see the option "PgDn To Scroll", there are additional help screens provided included. Press PgDn to retrieve the following screen.
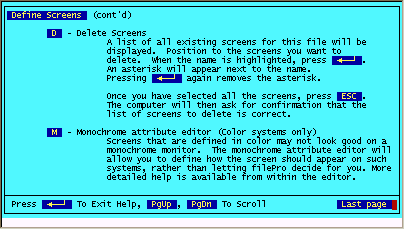
This is the last page of help for the selections as indicated in the lower right corner of the screen. Press Return To Exit Help and return to "rolodex" screen 0.

Press "U" to update screen "0"
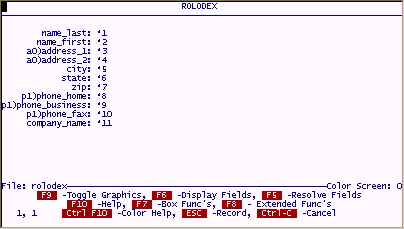
Notice that the options have changed at the bottom of the screen. Help is provided for the screen options, so press F10 to retrieve screen help.
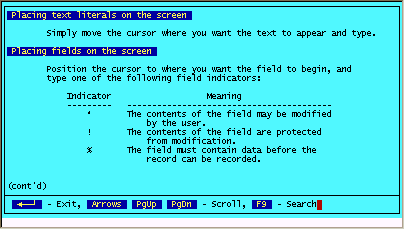
Notice that the help provides an additional option "F9 - Search" to search using indexed help. This feature was added in filePro version 4.5 to allow you to quickly access help on specific functions and topics based on your current selection options. Press F9, to get a list of available indexed help for this section of "Define Screens".
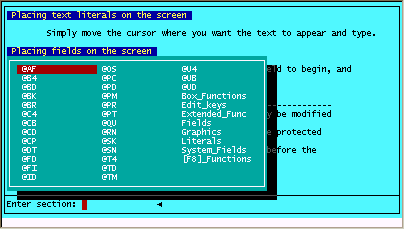
Generally, help follows standards which uses upper and lower case. Those items in all uppercase are filePro functions, System-Maintained-Fields or commands, whereas items in upper and lower case are HOW-TO or general topics.
Example - selecting @CD (creation date) will go to a description of the system-maintained field @CD and other system-maintained fields. When selecting "Fields", you are placed in the section which describes how to place fields, including @CD, on a screen. Highlight @CD and press Return to get the following screen.
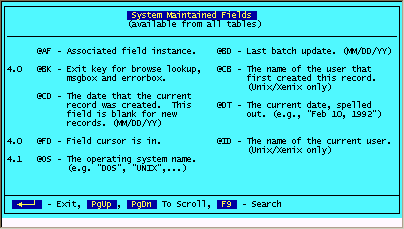
When pressing F9 again and highlighting "Fields", you are returned to the original help screen when starting discussion on this sub-topic.
Press F9 and highlight "Fields"

Copying a Screen
Press Return to exit help and return "Rolodex" Screen 0.

Although you could use Screen 0 to enter data for the Rolodex, any changes made to screen 0 will be potentially overwritten when redefining the file. For this reason, it is a good practice to copy the default Screen to another screen name. This will ensure that any changes we make to the screen are preserved.
Press C to copy the screen.
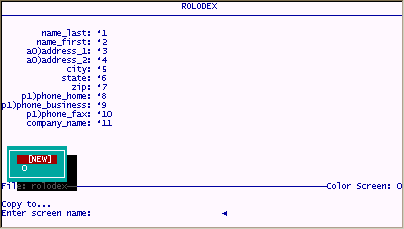
Since we will be copying Screen 0 to a new screen, highlight [NEW] and press Return. At the screen name prompt, enter 1 (meaning copy to screen 1) and press Return.
Adding Fields
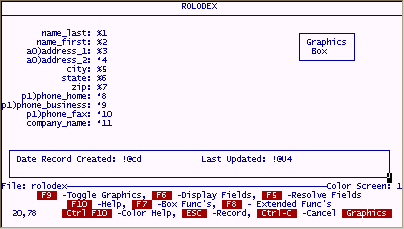
Notice how the screen name has changed in the lower right hand corner to Screen: 1. Press "U" to update the screen. Use your arrow keys to go to row "18" column "4". Use the cursor position number in the lower left corner of the screen to get to the starting position. Type in a literal "Date Record Created: ". Use your right arrow key to go right two positions and type "!@cd" for the system field "Creation Date". Press the TAB key twice and type "Last Updated: !@U4". Your screen should look similar to the following screen.
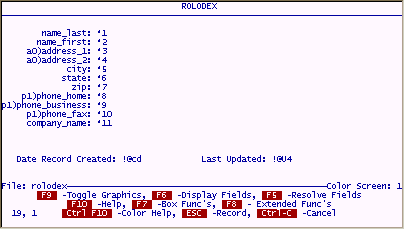
We have just added two system-maintained-fields. The exclamation point "!", preceding the system-maintained fields, is a " field indicator" and has the meaning "the field is protected from update". Notice that the other fields are prefixed with an asterisk "*". The "*" field indicator means that the contents of the field can be optionally modified. There is another field indicator, the "%", and meaning that the field is a "must fill" or mandatory field. Lets change the screen to make the name_last, name_first, address_1, city, state, ZIP mandatory by replacing the "*" with a "%" field indicator. Your screen should look similar to the following after the changes.
' Toggle Graphics
When pressing the F9 key notice that the word "Graphics" is displayed in the lower right and corner of the screen.

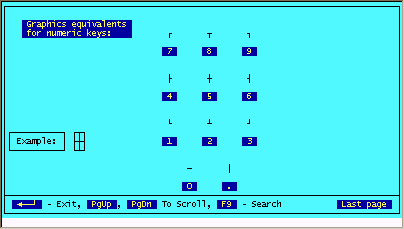
When pressing the F9 key again, the word "Graphics" disappears. This toggle feature allows you to change to the mode of the number keypad on your keyboard. (On single-user systems, the number-lock must be on.) When "Graphics" is displayed, the number keypad will place graphics characters on your screen instead of numbers. By pressing the help key and then pressing F9 for index search, select the help for "Graphics". You should see a screen that looks similar to the following and shows the relationship of the number keys and graphics characters.
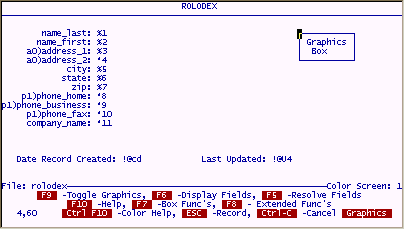
Place your cursor in a blank area on the screen (4,60) and draw a simple box by pressing the applicable keys on the number keypad and type a literal in the box "Graphics Box" as depicted in the following screen.
Box Functions - F7
Use of the F9 key and number keypad was the only way that you could enter graphics in older versions of filePro. This feature is useful when you want to repair a graphics box but a complete set of "Box Functions" are provided with later versions of filePro when pressing the F7 key. To get a description of the box functions, do the following.
Press the F10 - Help key, F9 for search and select Box_functions help as follows.
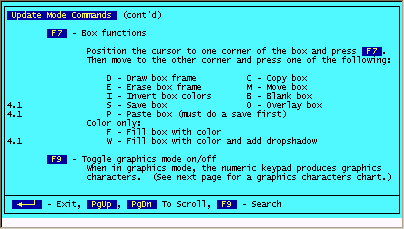
As you can see in the previous help screen, you have a range of options for manipulating the information while designing your screen with the "Box functions". To demonstrate how easy it is to use this function, draw a box around the system-maintained-fields that you previously added near the bottom of the screen. Place you cursor at position (17, 2) of your screen and press the F7 key. This will place a plus sign as an anchor for one corner of the box. Use the cursor keys to move right and down to position (20, 78) and press "D" to draw a box. Your screen should look similar to the following screen when done.
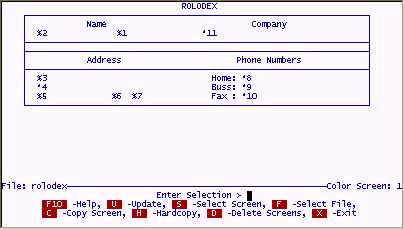
Try erasing the box by repeating the above procedure but instead of pressing "D" to draw press "E" to erase. Try drawing boxes around in other areas of the screen and move the information using "M". After you are done experimenting, press Ctrl -C to cancel the changes that you have made. If you inadvertently save the changes to screen 1, return to the "Copy" function, select screen 0, and re-copy screen "0" to screen "1". Change screen 1 to look like the following screen and preserve your screen by pressing ESC to record the changes.
Change Cursor Path
After moving the information around on the screen, the fields are now in a different order. If you used the screen for inputting data without making changes to the cursor path, (the way the cursor moves between fields) the cursor would jump all over the screen based on the field number order e.g. field 1 (name_last), field 2 (name_first), field 3 (address_1) etc. since the default cursor path follows the sequence of fields as they were defined and placed on default screen 0. You may want to print a hardcopy of the screen 1 to refer to the information at this point.
We can define a new cursor path by using the Extended options. Press "U" to update the screen, and press F8 for "Extended Functions". When pressing the F8 key for extended functions, the following screen is presented.
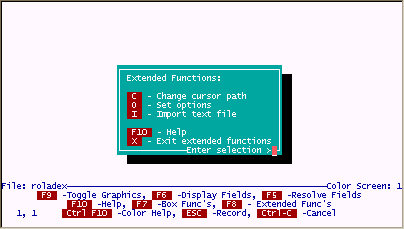
Press "C" to change the cursor path. You will see the original cursor path based on the sequence of the fields in the map. This cursor path was established when the default screen "0" was created during "Define Files". When in the cursor path screen, highlight field "1" and press the F4 key to delete "1" as the first field in the cursor path. Highlight field "3" and press F3 to insert a blank after "2". You can use the F3 and F4 to insert and delete respectively while editing the cursor path. Insert TABS by pressing the TAB key. Change the cursor path to agree with the following screen and press ESC to save the new path.
Note: The cursor-path program doesnt accept fields that are not used on the screen, protected fields, or undefined fields. Instead, it gives you an error message and returns you to the cursor-path screen so that you can correct the mistake. However, it does accept dummy fields created by " Define Processing ". There are no dummy fields included in this example.
Other Extended Functions
While in update mode, let's take a quick look at the other "Extended Functions" by pressing the F8 key. You should see the extended options selection menu once again as follows.
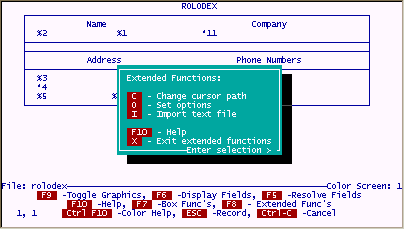
Select "O - Set options" to retrieve the following screen.
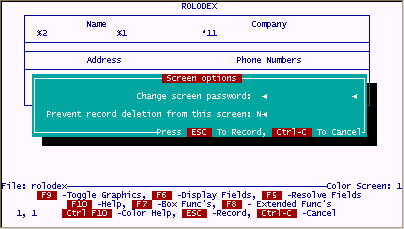
This extended function allows you to add a password for your screen and prevent record deletion when using this screen.
Press Ctrl C to cancel this option and to return to update mode. Press F8 again and select "I" for "Import text file". This feature allows you enter a path and file name to import text directly into your screen. Make sure to place the cursor in a blank area on your screen prior to importing text. Press Ctrl C to cancel this option and return update mode.
Display Fields
Press F6 to display fields previously defined for the "Rolodex" file.
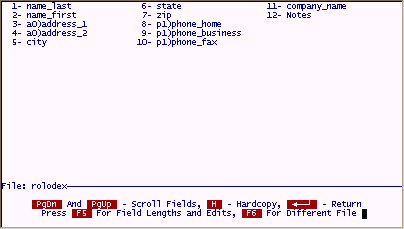
When pressing F5, field lengths and edits are displayed as follows.
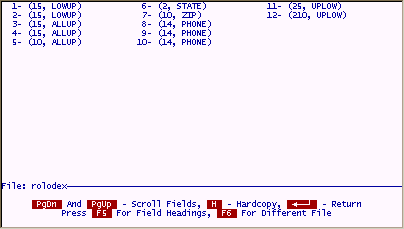
Press Return to go back to update screen mode.
Adding Color
If you have color capability on your system, you may want to spice up your screens to keep them interesting to the users by highlighting data entry areas and titles. You can press Ctrl F10 to retrieve help on this topic.
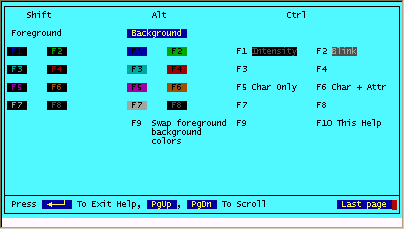
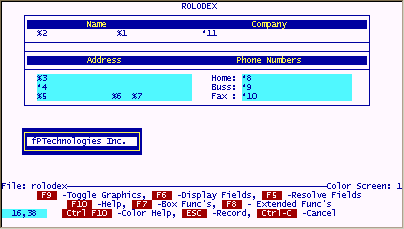
By pressing combinations of Shift, Alt & Ctrl with a function key, you can set color combinations to perform highlighting on your screens. Return to screen update mode and try setting various combinations of foreground and background colors. When pressing the key combinations you will notice that the color combination you have selected will show up in the lower left-hand corner of the screen. Try changing screen "1" to highlight the literals and draw a colored box around your name as depicted in the following screen.
After selecting your color combination, use the F7 key with "F" to fill color, much like you used it previously to draw boxes. In fact, you will use the "D" to draw the colored box around your name.
Resolve Fields
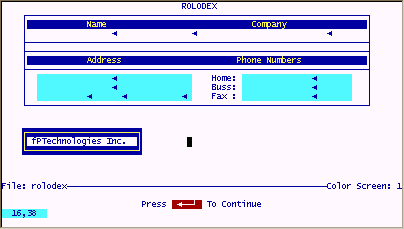
After completing the screen color changes, press F5 key to show how the screen will look to the users when using IUA . You should see a screen similar to the following when pressing F5. Press Return to continue updating your screen. Modify the screen colors, boxes etc. until you have a color combination that you like. Go to IUA and test your screen design.
When exiting "Define Screens", if you assigned a creation password, you will be prompted to change password or to press Return.
Note: See Technical notes on " Blinking " attribute.
Advanced Design - Define Screens
Field Indicators
The following field indicators can be used on screens to control data input.
|
* |
Accepts data. |
|
! |
Protected ----no data can be typed in. |
|
% |
Must-fill ---there must be data in this field before the record can be recorded. |
|
\ |
Truncates field. |
Use the TAB key to move quickly within a line. This moves the cursor right eight characters at a time. Make sure that you leave enough room for each field. "Enough room" is the length of the field plus one. An end-marker will appear in that last space. (End-markers on single-user systems are usually small triangles; on multi-user systems, periods or small boxes.) In other words, if field 1 is 15 characters long, leave 16 spaces counting from the field indicator:
Name_last: %1
If you leave only 15, the first character of the next field is lost. You may also wish to leave a second space for visual separation between the fields. Use F5 to check for visual separation.
Aesthetics: Lines, borders, boxes and screen headings have two purposes. They make screens:
Attractive
easy to use
Use subheads and borders to separate screens into logical sections. Think about the organization of your file ---- does the information fall into two or three parts (e.g., name-and-address information vs. account information)? If so, consider visually breaking the screen into two parts with a line or box.
Reverse video and graphics. Do you want instructions to the user on the screen? Consider doing them in reverse video---- dark letters on a light background instead of light letters on a dark background. For reverse video, press ALT F9 to return to normal mode, press ALT F9 again. When reverse is on, the cursor-position box is also in reverse.
For graphic character mode, press F9 to return to normal mode, press F9 again. When graphic mode is on, the word Graphics appears at the lower right corner of the screen. The graphic characters themselves are accessed with the numeric keypad at the right of the keyboard. (On single-user systems, the number-lock must be on.) To remember which keys access which characters, think of the keypad as a box with lines running through its center. The corners of the keypad are the "corner" graphics characters.
Use the F7 and F8 keys to draw lines and boxes quickly. To draw a box, you simply pick two diagonal corners of the area you want to enclose; press F7 at the two points. To draw a line, press F7 at the starting and stopping points. For vertical lines, put the two points within the same column on the screen. For horizontal lines, put the points on the same line. To erase a box, press F8 at any two diagonal corners. To erase a line or portion of a line, press F8 at the points where you want to start and stop the erasure. For reverse boxes, go into reverse mode and press F7 at two corner points. This creates a narrow black box within a highlighted box. For a highlight-only box, create a reverse box, then erase it with F8. The highlighted portion of the box will remain on the screen.
Note: All graphic and reverse characters can be overwritten and erased, reproduced and moved using the regular function keys.
Check List: Look over the format for errors, using this checklist:
|
a. |
Are there any spelling mistakes in the headings? |
|
b. |
Does every field have a field indicator? Use only protected-field indicators for system-maintained fields. |
|
c. |
Did you leave enough space for each field? |
|
d. |
If you have more than one field on a line, is there at least one blank space between the end of one field and the beginning of the next, and at the right edge of the screen? |
Use F5 to "resolve" (analyze) the screen. Check that fields dont overlap or run into each other ---look for each fields end-marker. If you have forgotten a field indicator, the field number appears; if you put a nonexistent field on the screen, the field number and indicator appear. If you've typed the wrong field number, the field length will look too long or too short. Only dummy and system-maintained fields do not change (see "Defining Processing" for information on dummy fields). After noting which fields need to be corrected, press Return to go back to the format screen.
You may want to pre-set the movement of the cursor through the record. For instance, rather than having the cursor move from left to right, top to bottom through the screen, as it usually does, you can have it go up and down through columns. If the screen is split up into sections, you may want to set tabs that let you jump from one to another quickly.
Note: If youve restructured the file or revised the screen, a message saying that the cursor path is invalid may appear.
How to Revise Screens
The only difference between creating and revising a screen is that, when you change field numbers, you invalidate the cursor path. If you see a message saying that the cursor path is invalid, you should revise the path to match the new format.
Color on Screens
Color can be added to screens created in the Windows versions of filePro. If you add color using the Windows version, the color version of the screens can be transferred to non-WINDOWS versions (even though you can not create colored screens in non-WINDOWS versions) and used if your terminals or workstations are capable of displaying color screens.
If your IBM PC/XT has a color monitor and adapter card you can set both background and foreground colors for the entire filePro program. Use the "Set Color" utility to modify the default screen colors.
Some Extra Considerations
Avoid including Screen 0 (created by "Define Files") in your finished application design. If you modify this screen and later, by accident, ask Define Files to build a screen for you, it will wipe out any changes or modifications you have made to Screen 0 and build you a fresh screen. For this reason, it is sometimes helpful to "Copy" Screen 0 to another screen, usually Screen 1. Then, delete Screen 0 and continue modifying and enhancing Screen 1.
Cursor Paths: If you have eliminated fields from a screen that already has a cursor path, the program may warn you that the cursor path is no longer valid. If you forget to put a field on the cursor path chart, the program adds it to the end of the list automatically. Unless that is where you want it, you should go back to Define Screens and add it to the cursor path chart at the appropriate spot. Use the F3 and F4 keys to open and close spaces.
When you update records in Inquire, Update, Add, the program refers to the cursor-path chart as you move from one field to the next. If you have no chart, the program uses its own cursor-movement rules.
The up and down arrow-key rules have particular significance because the keys will seem to skip fields if indicators arent aligned. The rules are:
When you press the down key, the cursor goes to the first character of the field just below it; if it finds no first character, it goes to the first character of the field to the right of its previous position.
When you press the up key, the cursor goes to the first character of the field just above it; if it finds no first character, it goes to the first character of the field above and to the left of its previous position.
For example, say that this is your format:
Company: * 1 Contact: *2
Street: * 3 City: *4
If you update field 1 and press the down key, the cursor jumps to field 4, not field 3. If youre in field 4 and press the up key, the cursor jumps to field 1, not field 2.
To get the cursor to move straight down when you press the down key and straight up when you press the up key, simply align the field indicators.
It is possible to send the operator from screen to screen during data input. See SCREEN in "Defining processing."
filePro Style Headings: If you want your headings to match the ones applied with filePro, use all uppercase letters, separate each letter from the next with a space (three spaces between words), center the heading, and use an underline.
Concatenating fields on a screen:
There may instances when you want to combine fields like name_last, name_first and middle_initial on the screen so that a lookup name is combined e.g. Smith, James, G. to be displayed as James G. Smith. This can be easily done by creating a dummy field that combines the 3 fields and concatenates the fields leaving a single space between name_first, middle initial and name_last.
Create the dummy field in automatic or input processing to hold the value of the displayed field as follows;
Then: n(32) = 2 < 3 {"." < 1
where "n" is defined as name with a length of 32 characters (15 characters for Name_last & name_first, and 2 characters for middle_initial with the "." period), field 2 = name_first, field 3 = middle_initial and field 1 = name_last. The "<" pushes a field left leaving a single space between values and "{" pushes left and leaves no space between the values. The literal "." is placed tight up against the middle_initial.
Place the dummy field on your screen using "!n".
Concatenated fields are normally used for display purposes only and therefore should be treated as protected fields by using the "!" field indicator. If you have a need to update the fields, keep them separate as defined in your file.
Note: You can put arrays of dummy fields on screens. See " Defining Processing " for more information on arrays and dummy fields.
Truncating Fields:
Use the slash "\" field indicator to truncate fields on a screen. This will establish a limit to prevent wrapping of the fields to the next line when the field length has not been defined.
New in Version 5.8.02 and higher
To implement a scrolling field, place a field as you normally do, but then place a backslash ("\") at the location you want to truncate the visible part of the field. Then, in *clerk, the field will only display as wide as the place you specified with the "\". However, when you are in the field, you can scroll horizontally. The EOF (end of field) designator will now also show a > indicating additional characters for a field when viewing a record.
Screen Limits:
Width and depth: 80 characters across, 20 lines down.
Size per screen format: up to 2,270 bytes (characters).
Maximum number of fields per screen: 200.
Maximum number of tabs per cursor path: 20.
Tricks:
Apply highlights to field contents by highlighting the field indicator preceding the field.
Remove end-markers by making the foreground and background colors the same at the end-marker position on the screen. Make sure that you use the screen background color to hide the end-markers.
Centering - hidden function under (M)ove box function. You can press (h) or (v) to center the boxed area horizontally or vertically.
Use Ctrl and F7 when in update mode to get the current color settings for an area on the screen. This is useful to duplicate existing color areas in other areas on the screen.
For portability to WINDOWS, it is important to keep the screen names to 3 characters or less. Otherwise, screens can be up to 7 characters long under Unix, and 25 characters in WIN95/WIN98/NT.