Meanwhile, we have only been able to call up customers by their Account#'s. How often do your customers remember their account number? Not often. In a Video Rental Store, probably never! However, the computer and this program needs these unique numbers to bring up the proper records and attach receipts to the proper accounts. There is a way to let the user find the Account#'s by supplying the "name" of the customer. (They don't usually forget this.)
The browse lookup function of filePro is ideal for doing this task. It will let you put in a few characters of someone's last name and then show you all the closest matches in alphabetical order. Besides the name, other information about the customer can be displayed so that you can further identify the correct account. Once you are sure you have the right account selected, you call that information into the receipt record and move on to enter the items being rented.
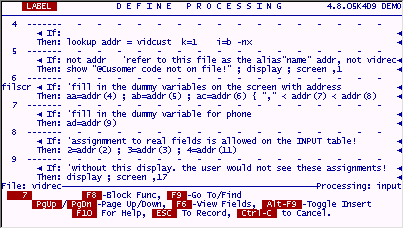
Here is another important aspect of filePro (and programming in general). If you write your code in a well-considered style, you won't have to write as much of it. You will be able to make certain pieces of code do double and triple duty, even if they are not actually subroutines. We can do this very thing in this instance. The code to fill in the address and other customer info is already written. These assignments are found on line 6. All we have to do is give this line a "label" and we can direct another part of the program here.
Add the label "filscr" at line 6, while you are at it, make sure all the rest of your code matches this screen.

When you are done, go to line 22 and add the rest of the code to call up customer accounts by name.
First, enter some controlling code as follows.
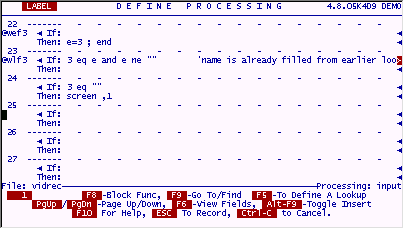
When you are done, put your cursor on line 25 and press F5 to design a browse lookup using the lookup wizard.
Enter the data shown on the following screen.
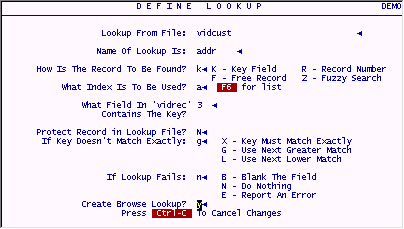
Because you have put a Y in the "Create Browse Lookup" prompt, the wizard will give you a new screen to finish the design.
Complete the browse section of this lookup by filling in the prompts on the next screen.
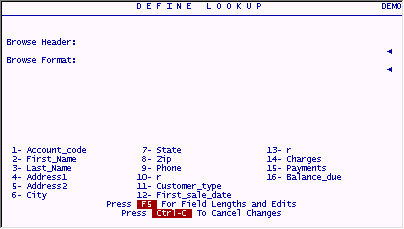
Note that the fields from the file being looked into are displayed for reference. (You can even see their lengths and edits by pressing F5.)
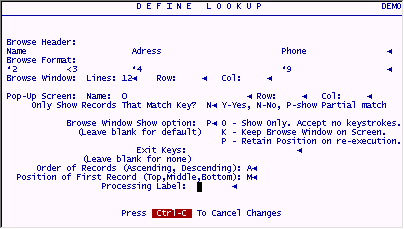
Enter the following data as shown. (Prompts will appear sequentially. You may move backward and forward through them. You may even return to the first browse screen by pressing the UP Arrow while in the Browse Header field.)
When you are finished, filePro creates the browse lookup code for you. It is important to note that this usually takes up two lines and extends beyond the screen to the right. You may use your cursor to scroll either line so as to view all the code. However, do NOT make changes to a browse lookup line from this processing table screen. Always use the lookup wizard which will create the lines properly. A misplaced space or punctuation mark will really mess things up.
Your screen should look like this:
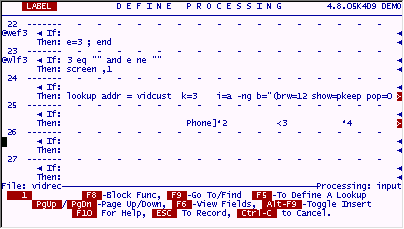
The first thing we want to do is put a label on the browse lookup line itself. This will be useful later.
Put the label "brwNAME" on line 25.
Now finish the browse lookup by adding the following code.
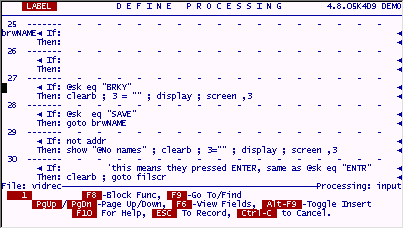
This code below the browse lookup pair of lines (lines 27-30) tests what the user does while the browse is on the screen. The way this browse is written, there are three keys which are important. That is there are only three keys a user can press while the browse is up that give control back to the processing table. They are ESCAPE, BREAK and ENTER. The system maintained field @sk (special key) is filled with labels at various trigger points within filePro. This is one of those trigger points. If the user presses ESC, @sk will contain "SAVE". If the user presses BREAK, @sk will contain "BRKY" and if the user presses ENTER, @sk will be filled with "ENTR". As soon as any one of these keys is pressed the processing falls through to the line immediately below the browse lookup pair. Here we can act on whichever key was pressed and do appropriate things.
If the user pressed Control-C (BREAK), the browse is cleared (CLEARB) and the cursor is put back into a cleared field 3.
If ESC was pressed, we want nothing to happen. The best way to accomplish this is to send the processing directly back to the browse line. Remember, we labeled this "brwNAME".
If there are no records found that match the key of this browse lookup, the "if" condition on line 29 will be TRUE. A message will be shown to the user, the browse window is cleared, and the cursor is returned to a cleared field 3. This will all happen without user interaction, except for the acknowledgement of the SHOW warning message. (It is important to note that filePro will also put up a message about there being no records found for this browse lookup... that is part of the browse lookup function itself. This built-in warning message can be eliminated with the -s switch.)
If the user pressed ENTER while looking at the browse display, the processing will fall through to line 30 and the data from whichever record the highlighted bar was resting on will be loaded into the current record. This is done by simply doing a GOTO the "filscr" label we just added to the regular lookup used by the Account# search routine.
Once again, we get to try some of this code out.
Use the menu "video" and enter the receipts file.
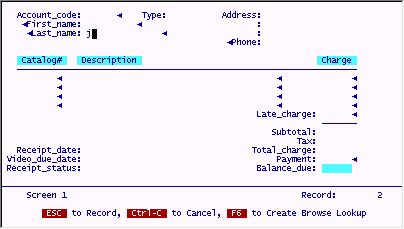
Go into Add Records mode. Skip past the Account# field by pressing ENTER and put a "j" in the Last Name field.
The following browse window will appear.
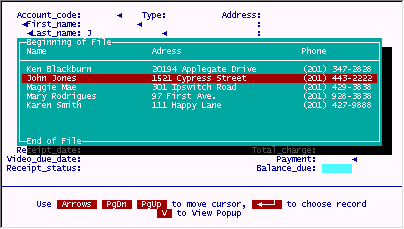
A very nice built-in feature of a simple browse lookup is the View function.
By pressing V, the record under the highlighted bar is pulled up in full screen view as shown below. This view function can help you isolate a desired record since more information is available than will fit on a browse line.
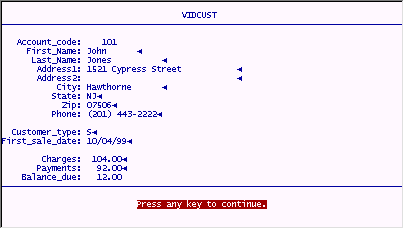
When the user presses ENTER from the full view screen, the popup is brought down and the user is returned to the browse window.
When the desired record is highlighted and the user presses ENTER, the browse is cleared and that record's data is brought into the current record and assigned just as if it were done with a regular lookup. It is important to note that the Account# which was not known, is now assigned to field 1 just as if we knew it all along.
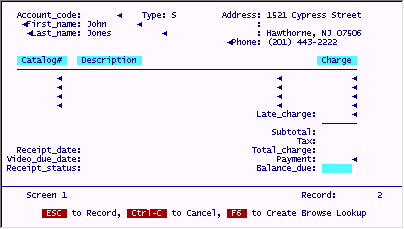
When you are done experimenting with this browse lookup, exit IUA and return to the main menu. It is not important whether you save any records or not.
Just about everything needed to add a receipt is done now except a final touch. The date and status fields must be filled in by processing.
Go into Define Processing on the "vidrec" file. Choose INPUT processing.
Put your cursor on line 15 and press F3 3 times to open up some blank lines. Add the code shown below.
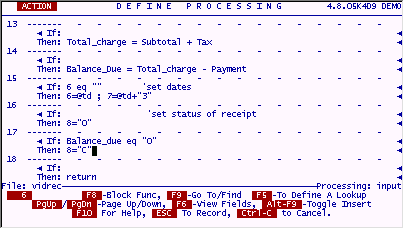
This code fills the date field 6 with today's date, and fills the due date with today's date plus 3 days. (This should be enough time to watch any video.)
Because of the "if" condition on line 15, the date assignment and calculation will only be done if the date field is empty. Any new receipt will have a blank date and the process will happen. Subsequent updates of this record will not cause the date(s) to be changed.
The status field is also set during this totals subroutine since it is dependant on the Balance_Due which is calculated and assigned here. This is a nifty and very useful snippet of processing. It is clever because, it first sets the Balance_Due field to "O" (for OPEN) no matter what. Then, on the next line, if the Balance_Due is exactly equal to "0" (zero) it is flipped to a C (for CLOSED). Two of the simplest lines you will ever see, but absolutely foolproof for setting such a status flag. (This field is sometimes called a flag because it quickly flags a record's status without having to test a field (in this case the Balance_Due). You can sort and select records based on this field as well.)
Enter the "vidrec" file and try out this newly added code.
Enter the following data and you will see the resulting date/status calculations immediately upon moving through one of the money fields.
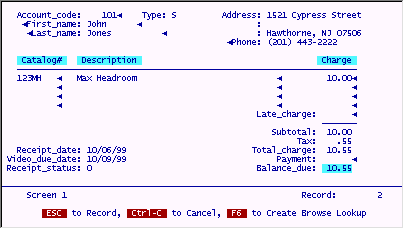
Feel free to experiment with this program as it stands now. When you are done, return to the main menu.
To make the receipts file "vidrec" much more usable, we will add some automatic indexes to it.
Go into Index Maintenance on the "vidrec" file.
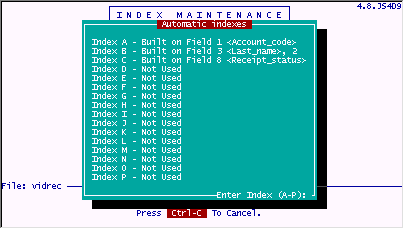
Build Automatic Indexes on the Account_code field, the Last_Name and First Name fields, and the status field.
The Automatic Indexes screen should look like this when you are done.
