We are now going to define another file for the application. We need a file to track video rentals and the receipt of money for those rentals.
Go into Define Files , choose [NEW ].
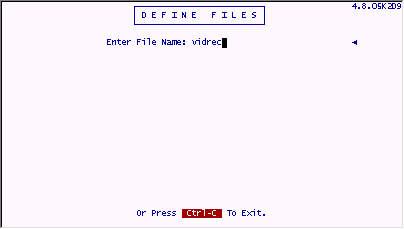
Enter the following name "vidrec".
Press Enter to continue. Do not give this file a Creation Password.
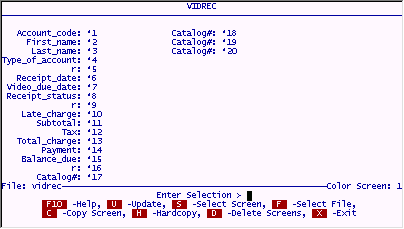
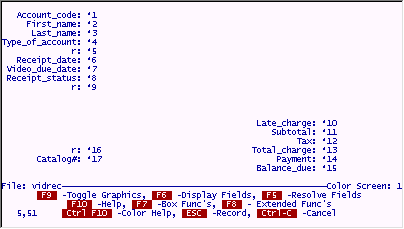
Enter the following data:
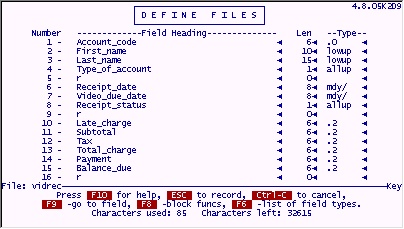
When you are done entering this data, press the NxtPage key and put your cursor on field 17.
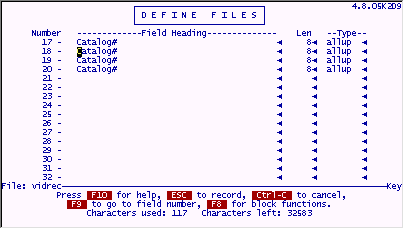
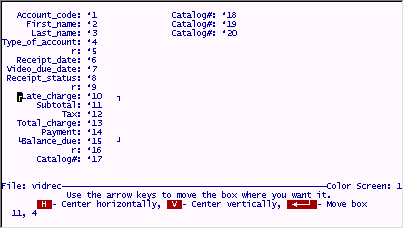
We are going to build 4 lines of detail for each record in this file. Since these lines are comprised of the same fields duplicated 4 times, the following procedure shows how to use the Block Function inside Define Files to quickly create duplicate fields.
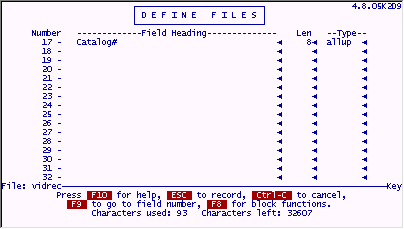
Enter the following data, then return your cursor to line 17.
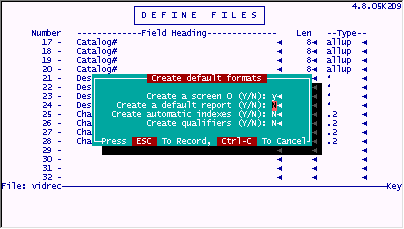
Press F8 to bring up the Block Functions dialog box. There is currently only 1 block function, it is duplicate fields.
Enter the following data:
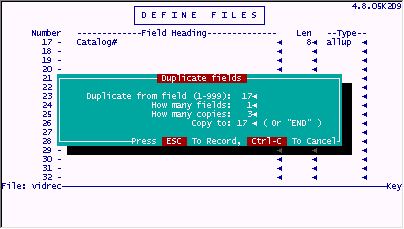
Press ESC to record your work.
The system will build the desired duplicate fields as shown.
We will build the other parts of these 4 lines in the same manner.
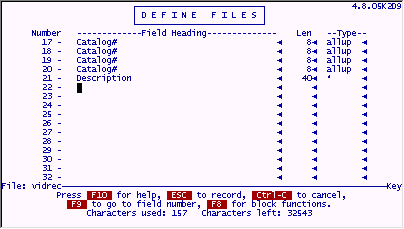
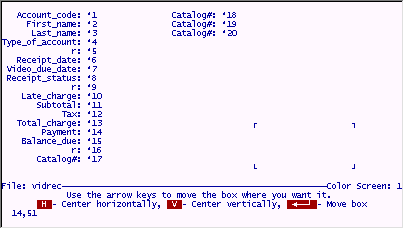
Enter the following data on line 21. Put your cursor back on line 21 when you are done.
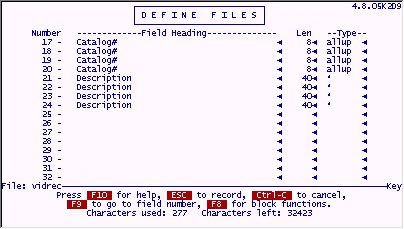
Press F8 to bring up the Duplicate Fields dialog box again.
The box should be ready to go as is. Make sure it looks like the following.

Press ESC when you are done.
filePro adds the requested fields.
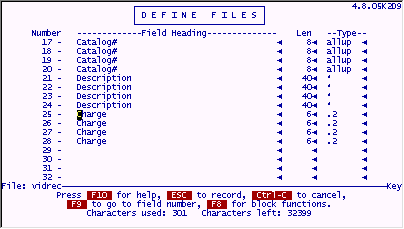
Follow this same procedure to make 4 fields for "Charges". Enter the first field on line 25 and then duplicate it 3 times.
Your screen should look like this when you are done:
Press ESC to save your work.
Press X to finish the design of this file.
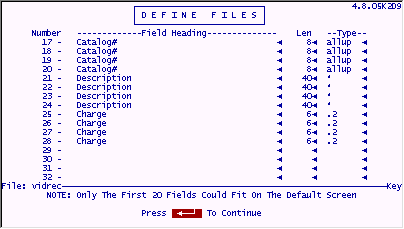
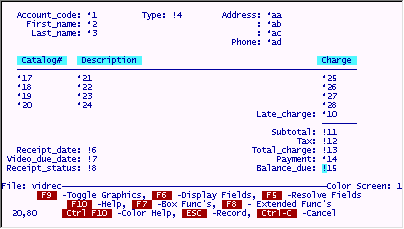
Enter the data as shown below:
Note that filePro will warn you that only the first 20 fields could fit on the default screen. This is okay, we are going to discuss this next.
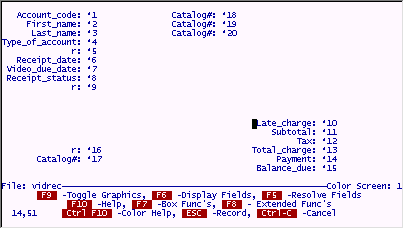
Go to Define Screens for the file "vidrec".
Choose Screen.0

Press C to copy this screen to a different name.
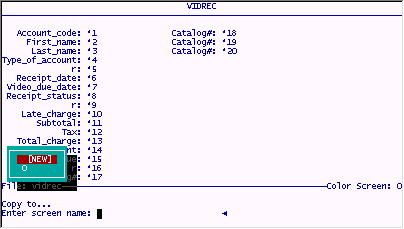
Choose [NEW]
Enter the name 1.
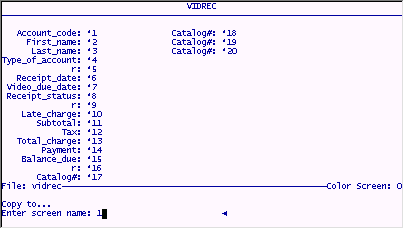
Note that you will now be looking at, or standing "on", Screen 1.
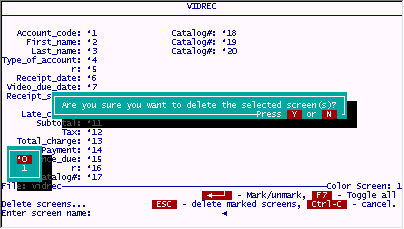
There is no need to keep Screen 0 around anymore. We will delete it so it will not be accidentally chosen by our users.
To do this, press D . Select Screen 0 , and press ENTER to mark it with a star. Pressing ENTER will unmark it also, this is a toggle. Once you have marked it, press ESC to actually delete it. You will be prompted for acknowledgment before the delete occurs.
We need to modify the screen to fit our needs. There are many functions inside filePro to help do this.
Press "U" for Update, put your cursor on line 1 of the screen and press F4 twice . This will pull up the lines of the screen to cover the default title and title graphic line.
Your screen should now look like this:
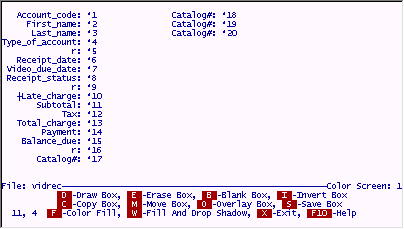
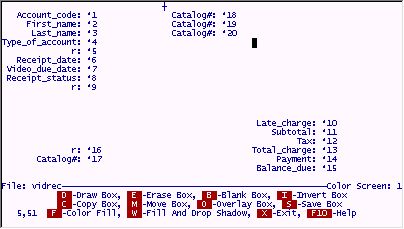
Here is how to access the Box Functions which aid in screen design.
Put your cursor on position 11,4 . (Position of cursor is shown at bottom left corner of the screen.), and press F7 .
A cross hair cursor will appear where your normal cursor used to be.
Now move your cursor to position 16,24 (the cross hair will not move). When your cursor is at 16,24 press M .
A box of "corner graphics" will be outlined from your starting position to your ending position. You can now move this area of the screen anywhere it will fit and press ENTER . This will literally move this section of the screen to the new position.
Use the Arrow keys to move this section of the screen to position 14,51 . (That is, put the top left corner of the box on position 14,51.)
When you're there, press ENTER .
The move operation will leave your screen looking like this.
There are several options for the Box Functions. A useful one is "blanking an area". To do this, select box functions by putting your cursor on position 1,33 , then pressing F7 . The cross hair will appear.
While the cross hair is visible, put your cursor at 5,51 and then press B .
That area of the screen will be blanked (cleared).
Using these box functions and any other trick at your command, make your Screen 1 look like the screen shown below. You will need to use Reverse Video for the line item headings and for the protected field indicator of field 15. Do this with Alt-F1 (to turn it on) and Alt-F8 to turn it off. ( HINT : The straight line is nothing but a very skinny box! Use the D option to draw this line.)
When you are done, press ESC to save your work.
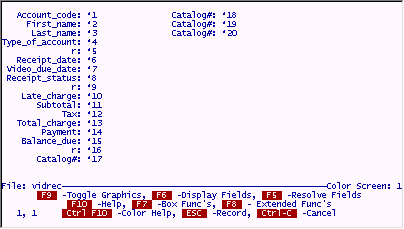
Since we have modified the screen from the way it looked when we first copied it, we must rebuild the cursor path. This is the roadmap that indicates how we want the cursor to move through these fields on the users screen while they are in IUA.
Press F8 to bring up the Extended Functions dialog box.
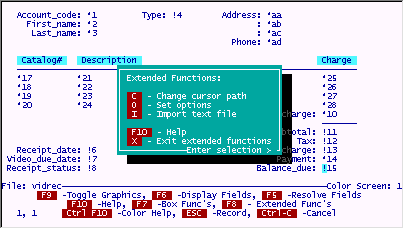
Press C for Cursor Path and the following screen will appear:
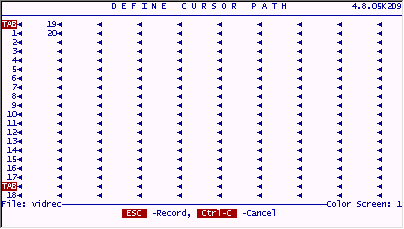
Correct the cursor path as follows. Use the F3 and F4 keys to push fields up and down on this screen. Wherever there is a TAB indicated, press the TAB key , and filePro will insert the word TAB for you.
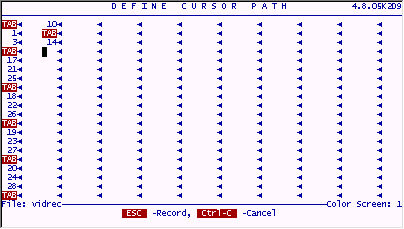
Press ESC to save your work on the cursor path. Press ESC on the main screen to save the entire screen.
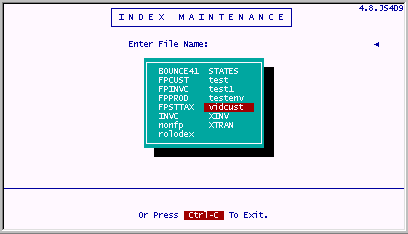
To access this file, we will need to build some automatic indexes for it.
Select C - Index Maintenance.
Choose "vidcust".
Select 1 - Automatic Index.
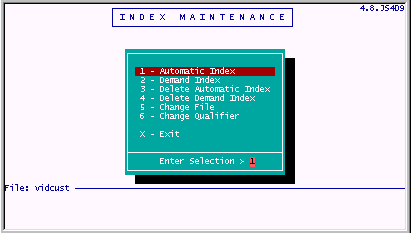
Select B.
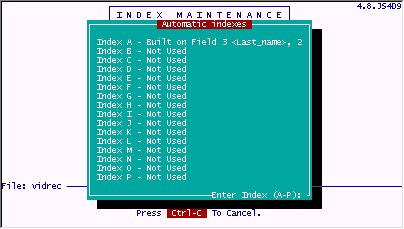
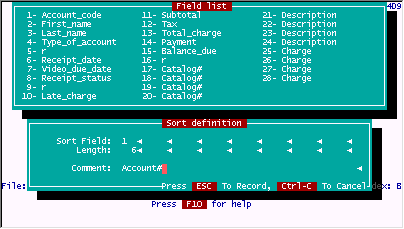
Enter the following data:
It's time to build some processing for the new file we've created, "vidrec". This file will hold receipts that will be "attached" to the customer file via the unique Account_code field. This means each time a new invoice is added, the Account_code (Account#) of the customer will be placed on the receipt record. Also, the customer's name and address can be pulled up automatically from the receipts file by using a lookup based on either the Account# or sometimes the Account Name.
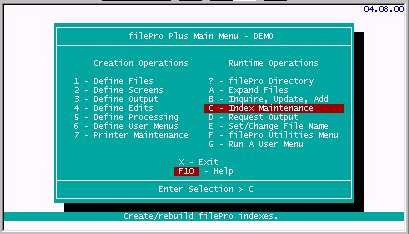
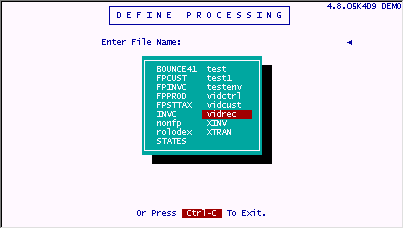
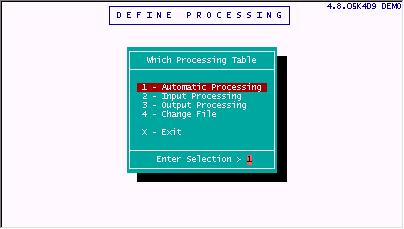
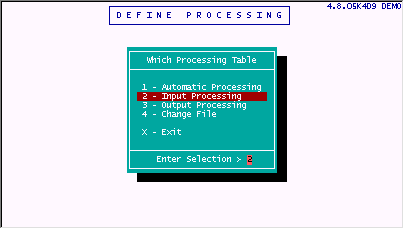
There will be several types of processing in the "vidrec" file; Automatic, Input, Trigger, and Output. We will start with Automatic. Go into Define Processing on the "vidrec" file.
Select 1- Automatic Processing.
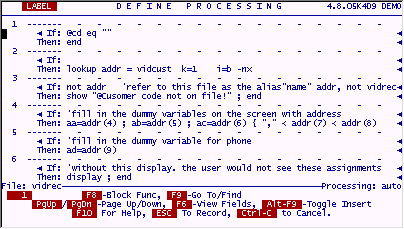
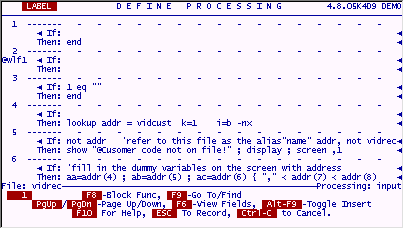
First, enter line 1 as shown. Then, put your cursor on line 2 so we can build a lookup using the lookup wizard.
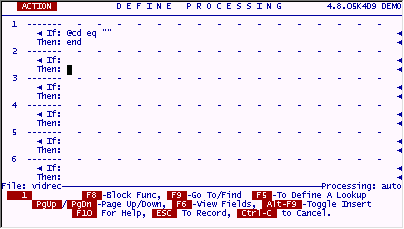
Press F5 to start the wizard.
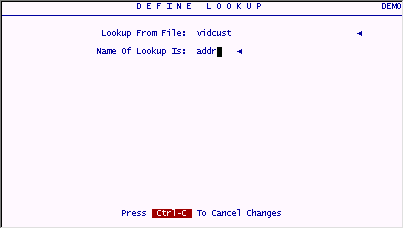
Fill in the following data. This time we are going to give the lookup file name a short alias. In other words, we want to be able to refer to this file as a different name, but it still means this file. The alias we will use is "addr".
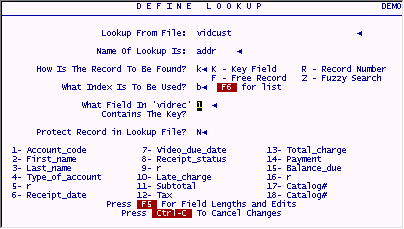
Here is the complete lookup. It is a Key field lookup. In other words we will find records in the lookup file based on a key field in this file (either a real field or a dummy field.) In this case, a real field, 1, is being used as the key.
Enter the data as shown on the next three screens. They show the lookup being built step-by-step.
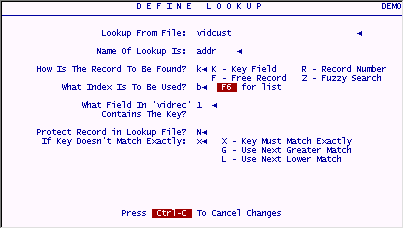
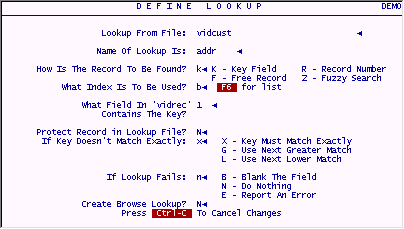
The final lookup line as constructed by the lookup wizard is as follows. As you can see, it is fairly simple and straightforward. As you get more comfortable with how lookups work, you may choose to simply type lookup lines in without using the lookup wizard.
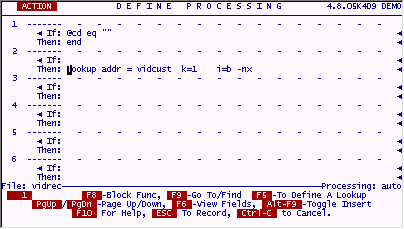
Once the lookup is performed, we can assign the values from the looked-up record to fields in this record. We will assign the values for address and phone number to "dummy fields". These dummy fields can be displayed on the screen without the need of storing them in the file. After all, the customer's address and phone are stored permanently in the "vidcust" file. Since we can look them up and use them any time we want, why store them in the computer on every single receipt record? It would be a waste of space. We will store the customer name in this file, since it will be valuable to be able to search the receipts file by name and to do this, the name must be stored on each record. But, we will never search this receipt file by address, or other even less important criteria.
The "not addr" on line 3 tells filePro what to do if the Account_code being looked for is not found in the "vidcust" file.
Make sure your table looks like this.
Press ESC to save your work.
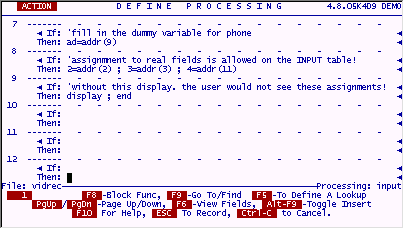
Next, we will enter some simple INPUT processing for the receipts file. Later on, we will elaborate on this processing, but for now all it needs to do is lookup the Account_code and address of specified customers. This INPUT table will be almost an exact duplicate of the AUTO table. The lookup is required on both tables for the following reason. The AUTO table will perform the lookup for any record that is already on file. If the user is looking at full screen views of the receipt file, as each record comes up on the screen, the AUTO table will lookup the address and phone number that is associated with the Account # on the receipt and display it in dummy fields on the screen. The INPUT table will do the very same thing for new receipts as they are being entered. In fact, the lookup to retrieve address and phone# will be done when the user enters a valid Account #.
Select 2
Since the INPUT and AUTO table have very similar code to perform the lookup we are writing, we can grab the code from the AUTO table in one fell swoop and then just modify it slightly, rather than typing in all that code over again. Here is how to use the Block Functions to do this.
First, enter this much data on the screen.
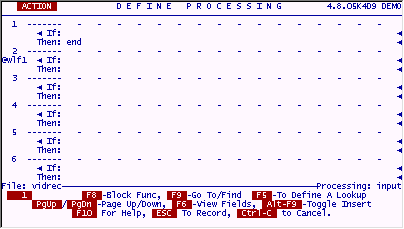
Put you cursor somewhere in element 3 and press F8 to call up the Block Functions. The screen will look like this.
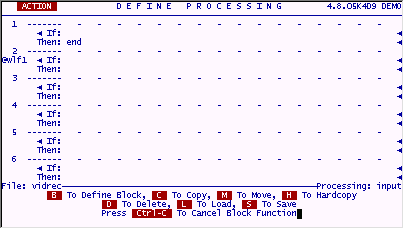
Press L to Load some processing from another table into this table. Follow along with the pictures and enter rest of this operation as shown.
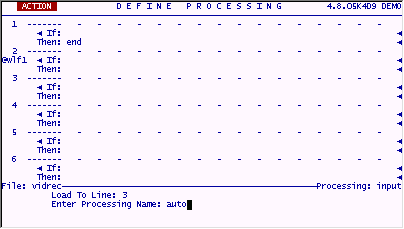
filePro will load a copy of the AUTO processing table starting at line 3.
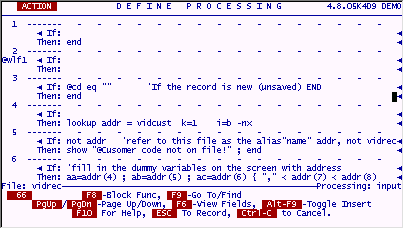
The AUTO table is very similar but not exactly what needs to be done on the INPUT table. Match your table to the screens following.
When you are done, press ESC to save your work.
Do a syntax check and fix any problems.
Note that besides assigning the address and phone from the "vidcust" file to the dummy variables which will be displayed on the screen, this processing also assigns some of the customer file data to "real" fields in this file.
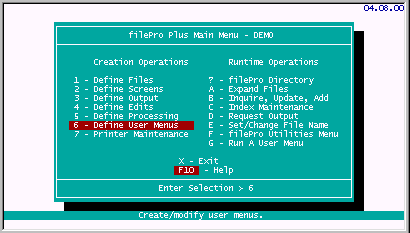
Before we try any of this programming, let's add the new file we created, the receipts file, to our existing user menu.
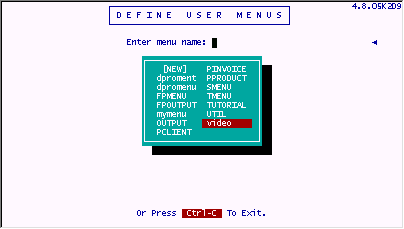
Select 6.
Choose "video". (Note that pressing "V" will jump you to the name as well, then when you press ENTER the rest of the name will be filled in automatically. All the filePro point-and-pick menus work like this.)
The following screen will appear:
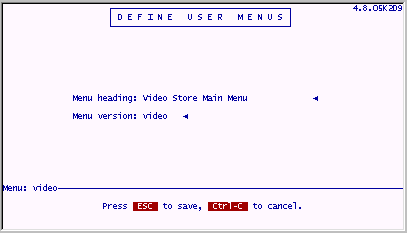
Press ESC on this screen without making any changes.
Add the following (line 3) to this menu:
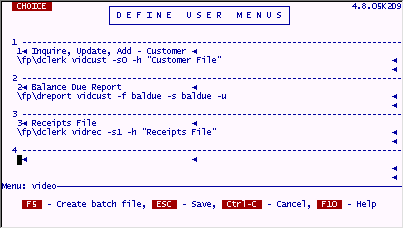
Press ESC to save your work.
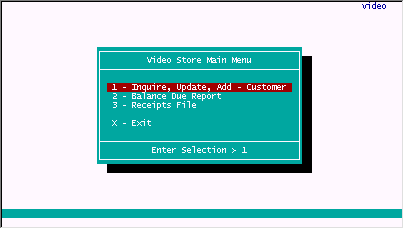
It's finally time to test out all of this programming!
Run the user menu "video" by pressing "G" at the main menu and choosing it.
The menu now looks like this.
Select 3.
At the "clerk" menu, Select 3 to add records.
The screen will look like the following.
Enter the following, (Account# 103) and press ENTER .
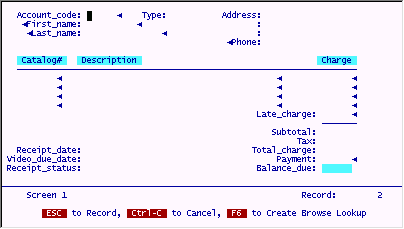
The name, address, type of customer and phone will pop in.
The screen will look as follows:
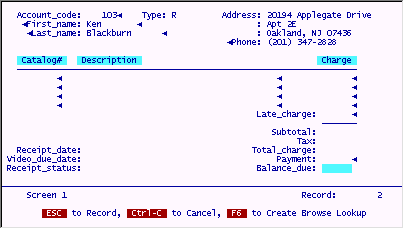
Note that this information popped in immediately after you entered the Account# 103 and pressed ENTER. This is exactly what we programmed it to do. The code on the INPUT table says that when the cursor leaves field 1 the lookup should be performed. By pressing ENTER after putting in the 103 your cursor was "leaving" field 1 on its way to the next field in the cursor path. This is the specific "trigger" that caused the lookup processing code to activate. Because there was a "DISPLAY" command just before the "END" of this code, the screen fields are all refreshed to their most current values. We see all the assignments that were just made by this lookup.