Version Ref: 6.1 (USP 6.1.01)
filePro now has the ability to place fill-in-the-blank PDF objects on output formats and also retrieve values from PDF documents that have fill-in-the-blank fields to be used in Processing. See PDF Printing for information on configuring an output destination to use a PDF format. This page will explain how to create basic form elements using this new feature.
There are four types of PDF Form Objects that can be used:
When a PDF output is generated, placed objects will be interactive in any supporting PDF viewer/editor. These PDF files can be saved after filling in fields, and processing can be written to retrieve values from these fields.
NOTE: Using the new generation features in a report can lead to unintended results. Fields are shared across records and pages. Updating one field updates all matching instances of that field throughout the document. It is recommended to use output forms over output reports.
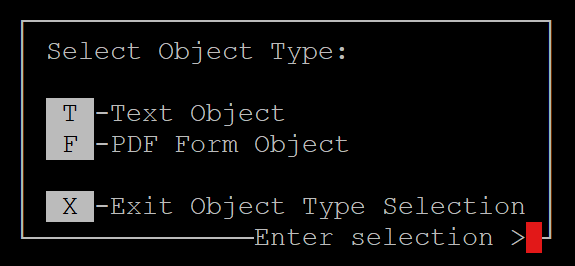
In Update Mode on an output format, press F8 for Extended Functions, then J to place an object. From here, one can press F to place a PDF Form Object.
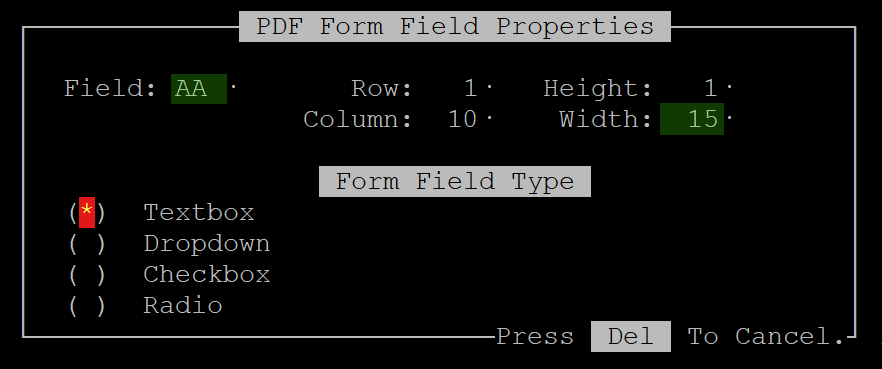
A window will appear with several options - which type of object to add, as well as this object's properties, such as width, height, and the row and column this field should be placed on.
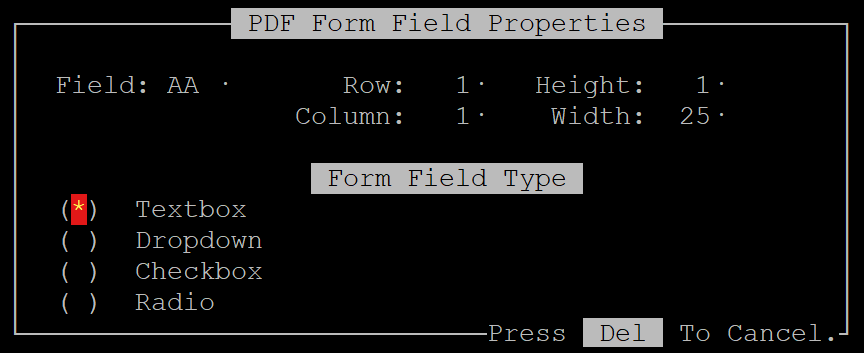
Move the cursor to select one of the Field Type options and press SPACE to select one of the four field types. Configure the properties as desired. Press RECORD to place the field on the output format.
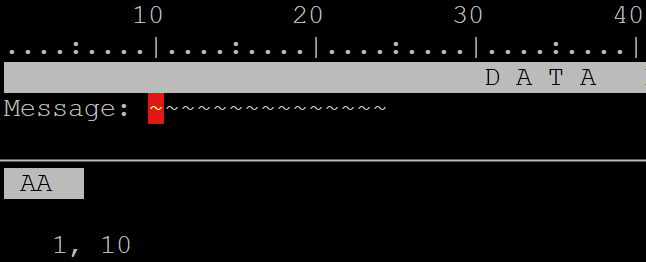
When the cursor is placed on an object, the object's Field property will be displayed in the
bottom-left corner of the screen. The space occupied by an object is represented by
~ characters.
Refer to the table below for a breakdown of each object property. If an object cannot use a particular property, it will not be shown in the properties window.
| Property | Description | Used By |
|---|---|---|
| Field | Placeholder data that goes in this object. Accepts real fields or dummy fields. | All Form Objects |
| Data | The comma separated list of options that can be selected when the dropdown arrow is used. | Dropdown |
| Row | The row of the output format to place this object on. | All Form Objects |
| Column | The column of the output format to place this object on. | All Form Objects |
| Height | The number of rows this object uses, starting from the Row and moving down. | Textbox |
| Width | The number of columns this object uses, starting from the Column and moving right. | Textbox, Dropdown |
A Textbox is a simple area where the user can input text, up to a certain length. Multiple rows can be included for large text areas spanning multiple lines. These are useful for things like names, addresses, and long descriptions.
To set a placeholder using a field, create and set a dummy variable or use a real field in
the format's Output Processing that has the same value as the object's Field property.
For example, to set a Textbox object's value to "Hello, world!", create a dummy variable
aa(13,*)="Hello, world!" and make sure the object's Field property is set
to AA. Make sure the width is long enough to accommodate the data in the field,
or the text will be chopped off!
Output Processing:
Then: aa(13,*)="Hello world!"
The resulting output using the example and images above looks like this:

Since this is a fill-in-the-blank form object, the "Hello, world!" can still be modified by the user - using a dummy variable simply sets the field's initial value.
Dropdown objects have an additional Data property that refers to a field containing a list
of comma separated entries that are predetermined and can be picked by the user.
Similar to the Textbox, the optional Field property can be used to assign a default value to
the field. The placeholder Field property does not have to match one of the options
from the Data list field.
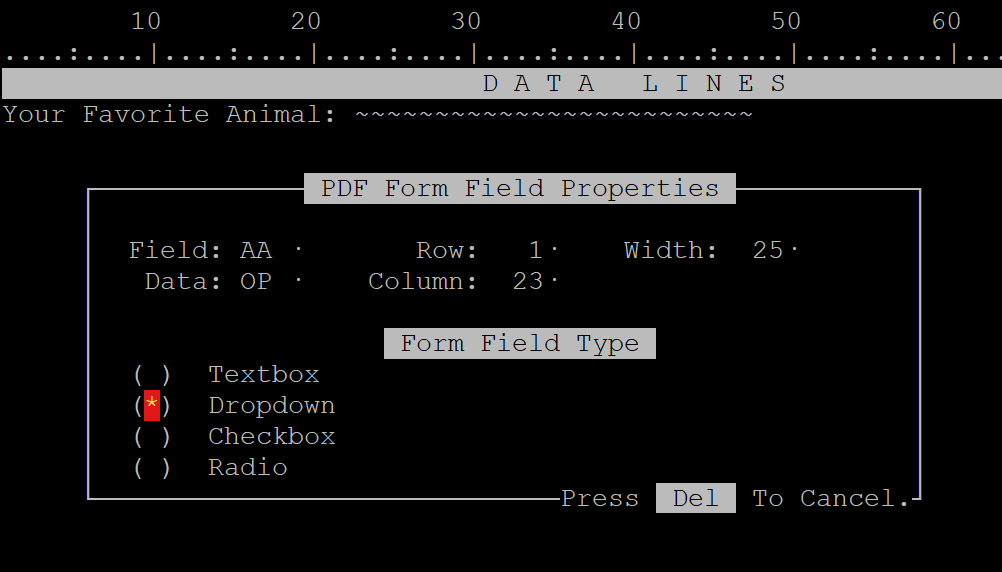
Output Processing:
  1  -------   -   -   -   -   -   -   -   -   -   -   -   -   -   -   -   -
       · If: ' The default option ("Field" property)                           ·
       Then: aa(25,*)="Choose an Animal...";                                   ·
  2  -------   -   -   -   -   -   -   -   -   -   -   -   -   -   -   -   -
       · If: ' List of animals to pick from a dropdown ("Data" property)       ·
       Then: op="Cat,Dog,Horse,Platypus,Triceratops";                          ·
The resulting output using the example and images above looks like this:
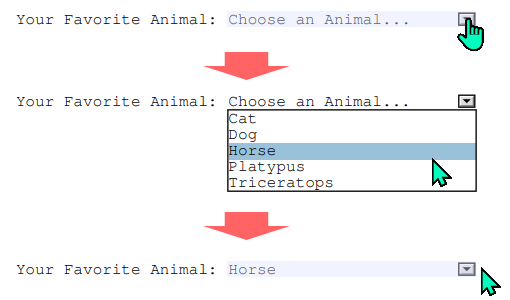
Selecting an entry from the dropdown list will replace the default text.
NOTE: Once a selection is made, it is not possible to revert back to the default
text.
The checkbox is a 1x1 box that can be toggled on or off. Each checkbox should have its own
(1,yesno) field reference. Setting a field in Processing to
"Y" will generate the field's checkbox as "checked".
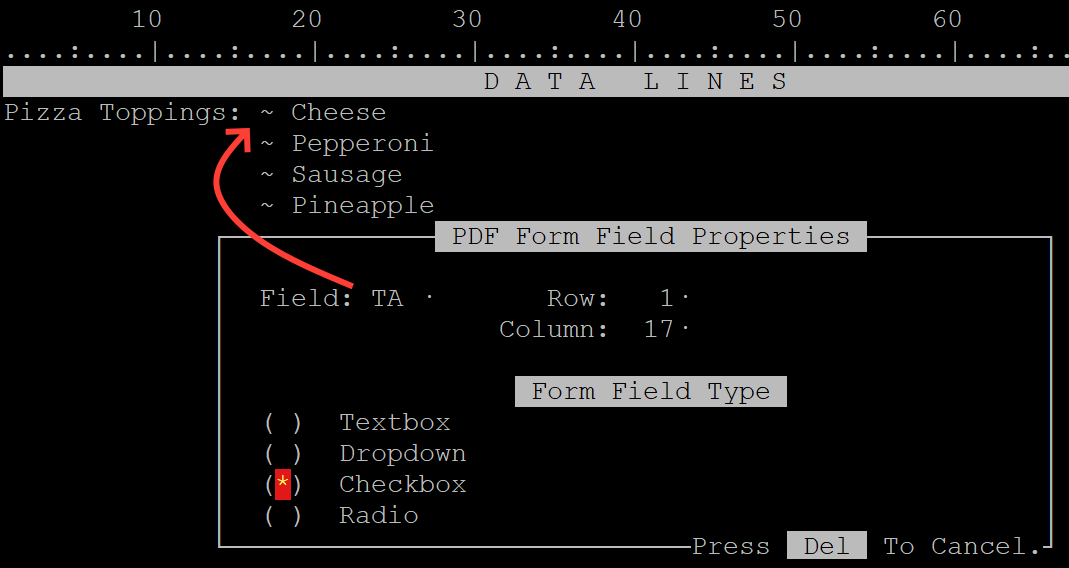
yesno checkbox object with fields TA,
TB, TC, TD, and TE.
Output Processing:
  1  -------   -   -   -   -   -   -   -   -   -   -   -   -   -   -   -   -
       · If: ' Toppings A thru E                                               ·
       Then: ta(1,yesno); tb(1,yesno); tc(1,yesno); td(1,yesno); te(1,yesno);  ·
  2  -------   -   -   -   -   -   -   -   -   -   -   -   -   -   -   -   -
       · If: ' Mark "Cheese" and "Pepperoni" as checked                        ·
       Then: ta="Y"; tb="Y";                                                   ·
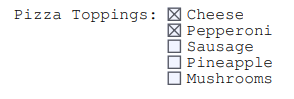
The resulting output using the example and images above looks like this:
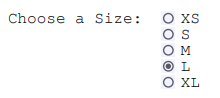
Radio buttons are similar to checkboxes, but are grouped together under the same field,
meaning only one option in the radio button group can be selected. Instead of a
(1,yesno) field, radio buttons are referenced by their index number
and should use an appropriately sized numeric edit such as (1,.0).
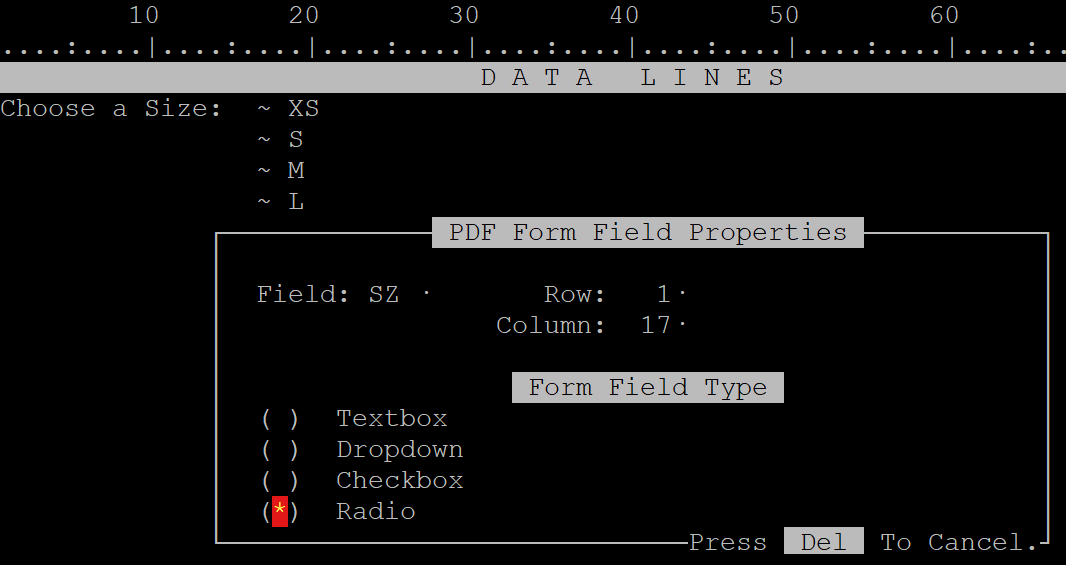
SZ. This will group
all the objects together in the same radio button "group".
  1  -------   -   -   -   -   -   -   -   -   -   -   -   -   -   -   -   -
       · If: ' Mark the fourth shirt size, "L", as selected                    ·
       Then: sz(1,.0)="4";                                                     ·
The resulting output using the example and images above looks like this:
Processing can also be used to read in values from a PDF Document.
If the PDF was created with filePro, field names will be either the real-field or dummy field used to create the PDF object.
e.g. "1", "42", "aa", "ab".
Use these commands to read filled-in PDF documents:
handle = PDF_OPEN(pdf_path)
Returns a handle value (10,.0) that points to a PDF document
with pdf_path as the filename. Returns a negative value on error.
error_value = PDF_CLOSE(handle)
Frees all values and memory associated with a PDF handle and closes the document.
Returns a non-zero number on error.
num_fields = PDF_GETNUMFIELDS(handle)
Returns the number of fields in the PDF document.
name = PDF_GETFIELDNAME(handle, index)
Returns the full name of a field in a PDF document,
given its index. The index is a number between "1" and the num_fields
value returned by PDF_GETNUMFIELDS.
type = PDF_FIELDTYPE(handle, fieldname)
Returns the field type name of the specified field fieldname,
which is one of:
name = PDF_FIELDTYPE2(handle, index)
Returns the field type name of the specified field index,
which is one of:
The index is a number between "1" and the num_fields
value returned by PDF_GETNUMFIELDS.
value = PDF_GETVALUE(handle, fieldname [, richtext])
Returns the field value, e.g. the text
in the field, checkbox status, combo box index, etc. for the given field name fieldname. Optionally, richtext
can be set to "1" to return rich text data if it exists.
value = PDF_GETVALUE2(handle, index [, richtext])
Returns the field value, e.g. the text
in the field, checkbox status, combo box index, etc. for the given field index index. Optionally, richtext
can be set to "1" to return rich text data if it exists.
The index is a number between "1" and the num_fields
value returned by PDF_GETNUMFIELDS.